CPCW Room 312 is equipped with a large monitor, in-room iMac, VGA and HDMI laptop hookups and a sound bar.
The Short Version:
Order of Operation is key!
1 . Make sure monitor and sound bar are turned OFF. If using a laptop, do not connect until instructed below.
2. Power on the monitor.
3. Select which input you would like to display (PC (in-room iMac), Laptop or Video).
4. If sound bar did not power on with monitor, power it on now. Make sure the “Input” on the sound bar is set to “TV”.
5. If using a laptop, connect it now. If connecting via VGA and using audio, make sure audio cable is plugged in and that the audio output is set to headphones. If connecting via HDMI, no audio cable is necessary but make sure audio output is set to SHARP HDMI.
6. If audio is not playing out of sound bar, unplug the HDMI connection from the in-room iMac or laptop and plug it back in.
The Long Version (with images):
1 . Start by making sure the monitor and sound bar are turned OFF.
The monitor is turned off / on via the panel on the wall. The sound bar has a power button on the front right and will light up on the left side when powered on. If planning to connect your laptop to the monitor, do not plug in the VGA or HDMI connection until instructed below.
2 . Turn on the monitor by pressing “ON” on the touch panel on the wall.
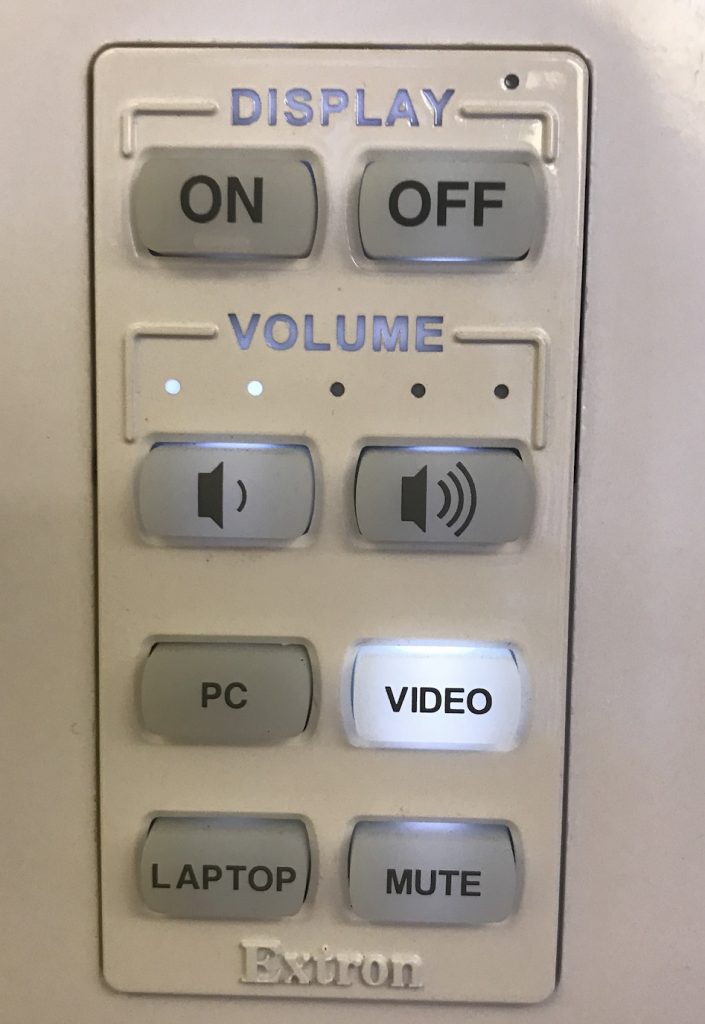
3. If using a laptop, do not plug the VGA or HDMI cable into it yet! First, press which input you would like to display on the screen.
PC: The iMac that sits immediately below the monitor (no additional connections required)
Laptop: Plug in your own laptop into the wall via VGA (and audio cable, if necessary) connection
Video: Plug in your own laptop or device into the wall plate via HDMI connection
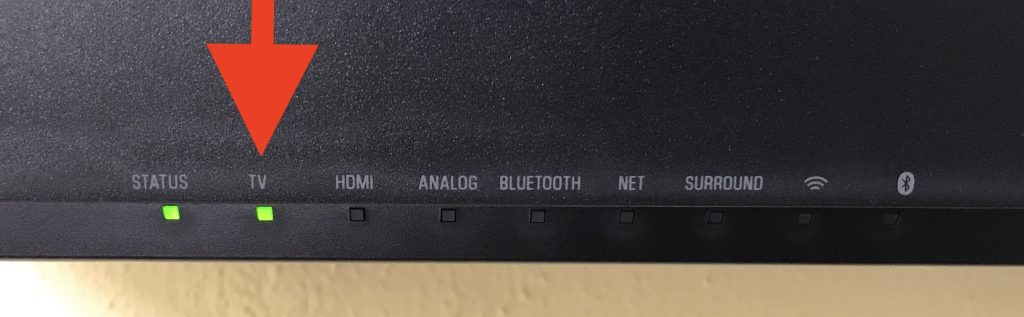
4. If the Sound bar did not automatically turn on when the monitor was powered on, power it on now by pressing the power button on the front right. If the sound bar is powered on, you will see a green light illuminated above the “Status” on the front left of the sound bar.


5. Now, connect your laptop (via VGA or HDMI cable) to the panel box –or– start using the in-room PC (iMac).

Tips On Using the Sound Bar
1 . Make sure the soundbar is powered on and that the light above “TV” is illuminated. If “TV” is not illuminated, hit the “Input” button on the front right of the sound bar till it is lit.

2. If using an HDMI connection, make sure that the sound output on the in-room PC or your laptop is set to “SHARP HDMI”. If using a VGA connection (with the audio cable plugged into your headphone jack), make sure your sound is set to headphones. On a Mac, this is set in System Preferences -> Sound -> Output

3. If sound is still coming out of the in-room PC (iMac) or your laptop speakers, unplug your VGA or HDMI cable and plug it back into your laptop.
4a. Sound bar volume is controlled by using the buttons on the front of the sound bar.

4b. If the sound bar is turned off, monitor volume is controlled by using the volume buttons on the touch panel on the wall.


