How to Create an Offline MDT USB Drive

“MDT on a Stick”

MDT is excellent at deploying operating system images over the network, but in some cases, the network is not good enough for reliable deployment. Air-gapped networks or others with limited bandwidth can prevent MDT deployments from succeeding. I have a couple of spaces like this and in those areas I use a complete self-contained MDT deployment share on a single USB drive. Fortunately, USB drive prices have come down enough to make a large-capacity drives easily affordable. In this case, I would focus more on the USB drive’s speed in addition to capacity.

This process is pretty straight forward, it just needs a bit of time and a decent amount of free hard drive space.

The first thing needed (obviously) is a working MDT deployment share. If the share isn’t working properly, those issues will transfer to the offline deployment share/USB drive. Secondly, the MDT share needs to be laid out in detail and organized. The more it is, the better options will be for the offline MDT USB drive.

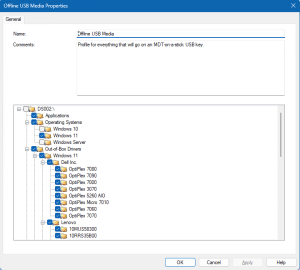
The offline share’s definition is based on an MDT selection profile. This determines what components of the MDT deployment share get incorporated into the offline USB drive.


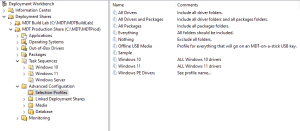
To create, right-click the Selection Profiles folder and choose “New selection profile.”


Most of the deployment share contents need to be selected for the offline USB to work. The differences available depend on how many levels of organization are built into the deployment share. I have everything broken down by operating system. This allows me to create an offline USB drive for just Windows 10, Windows 11 or both with the matching ISOs, task sequences and drivers.

Once created, you can choose to add/remove components to the offline share via that selection profile. Here I have just the items needed to deploy Windows 11. Windows 10 isn’t long for my network.

To contain all of this a media file is created which will hold an exact copy of the source MDT deployment share, as defined by the selection profile. This is where the decent amount of free HDD space is needed. If the deployment share is 200GB, the drive where the media file lives will need at least that amount.

The media file’s properties is a replica of the deployment share’s properties and would be configured as a regular MDT deployment share.

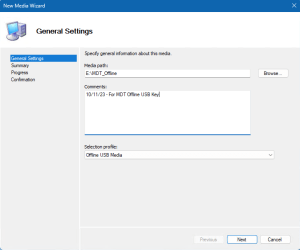
To create the media file, right-click the Media folder and choose “New media.” It will ask where to create and store the media file and which selection profile it should use. Quick video showing how to create the selection profile and media file.

As one would for a regular MDT deployment share, options can be configured for the configuration.ini and bootstrap.ini files as well as regular preferences. Changes made to the media file properties do not propagate back to the source MDT deployment share. Changes made to the source MDT deployment share DO propagate down to the media file when the media file is updated.

Quick video about editing the media file.

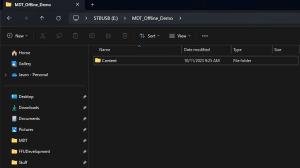
The directory where the media file lives holds a copy of the deployment share in the “Content” directory as well as the resulting ISO that is created. If the intention is to have multiple media files, house each in their own directory.

After everything has been created and configured, the media file needs to be updated. This is the same as updating the deployment share with the differences being that a new ISO is created each time the media file is updated. The entire deployment share will be copied into a Windows PE ISO. This happens in its entirety each time the media file is updated. The are no deltas incorporated. Given the size of the selection profile and the speed of the storage media, this can take a bit of time.

After that, the ISO can be tested in virtualization or written to a USB key. Test it all out before writing to a USB drive. Keep in mind all of the software, ISOs and scripts that are on the MDT deployment share, now reside on that USB drive.

Enjoy!


Back to basics: Configuring a static IP address on Windows 10

Static IP addresses ensure that the computer’s hostname aligns with the designated IP address in Penn’s DNS service. To configure properly, one will need the correct IP address, correct subnet mask, default gateway, and two addresses for Penn’s DNS servers. All of those items can be had for the asking. DO NOT make any configuration changes without having all of the correct values described above. Local administrative privileges will also be needed to do this.

Windows 10 offers two ways to configure a static IP address through the GUI . The first way is with the new System application. Second is through the traditional Control Panel (control.exe). The first way is problematic and never saves any manually entered configuration. Don’t use it. Instead, this tutorial will focus on configuring a static IP address through the Control Panel.

We’ll configure the following values for example.
IP address: 192.168.1.25
Subnet mask: 255.255.255.0
Default gateway: 192.168.1.1
DNS 1 & 2: 8.8.8.8, 8.8.4.4

1. To start, search for “control.exe.”
2. Select (click) the “Network and Sharing Center” applet.

The Windows Control Panel

3. From the top-left, select the “Change adapter settings” link (under the “Control Panel Home” link).

4. A new window will appear, showing all installed network adapters. Double-click the adapter titled “Ethernet.”

5. Click the “Properties” button. Admin username and password will be needed.

6. Next, click the “Internet Protocol Version 4 (TCP/IPv4)” item and then click “Properties.”

7. Fill-in the blanks in the resulting window and click “OK” to close the dialog boxes and save the new settings.


Just like houses on a street, no two can have the same address. The same goes for IP addresses. If two computers have the same IP address, neither will remain online. Make sure the IP information being entered is correct before proceeding.

Provisioning in a Post-Imaging World

Is this the end of MDT? The end of imaging as we know it? The Windows 10 operating system has made bare-metal OS management much easier. With utilities like “Reset this PC”, the only time a fresh copy of the OS needs to be installed is on new hardware. Even upgrading hardware such as hard drives, from HDD to SSD doesn’t require a fresh install. The traditional DISM.exe utility allows for capturing a WIM file from drive partitions for application on different hardware, but it won’t image a whole disk. Third party utilities like Acronis TrueImage and Macrium Reflect make transferring an existing Windows install to different hardware a snap. 

What does our organization do to set up new PCs for our users?

Image? No longer, we provision. Bigfix, our endpoint management system, allows for control of Windows’ every facet. With that, we can install all of the software we need end users to have and configure all of the settings as per organizational policy. Bigfix even offers a self-service option for applications that may need to be installed later on, by end users, without admin access. 

The Windows Configuration Designer (WCD) can run an automatic setup for a fresh Windows install, coming out from OOBE. Just place the PKG file on a USB key, insert USB into the target computer and boot. Setup first-run will ask if you want to apply the PKG file and that’s it. Depending on the config options chosen when building the package, you’ll have a desktop that is ready for software deployment when finished. WCD is not a complete desktop deployment solution, but it can get you through the inane first run questions, set up a local admin user and install small applications such as the Bigfix client. Once WCD is done, I can manage the PC through the Bigfix console.

We no longer have to replace one operating system with a customized version of the same thing. Provisioning is not the biggest timesaver in IT but it reduces the time spent performing repetitive tasks which should be automated. Bigfix can even upgrade the Windows Sku from Pro to Enterprise per our organization’s license agreement with Microsoft. If a hard drive fails, then we’re reinstalling on replacement hardware. Aside from that, we’ve found no reason to perform fresh installs anymore. Windows Reset works well along with System Restore to roll-back changes or just start from fresh. 

Group Policy-Managed Desktops Preferences

Starting with Windows Server 2008, Microsoft added a feature to Group Policy called “Preferences” (GPP). This allowed administrators to configure Windows settings Control Panel-style. Just like GPOs, GPPs contain dozens of configuration possibilities and when used properly, can make administration much easier. GPPs are divided into Windows Settings and Control Panel Settings, similar to a GPO. Each GPO has a set of preferences in both the Computer and User configuration settings.

Here’s how I use them on public computers.

Computer Configuration\Preferences\Windows Settings\Registry

  • Update = HKLM\SYSTEM\CurrentControlSet\Control\Terminal Server\WinStations\RDP-Tcp, Value name = PortNumber, Value type = REG_DWORD, Value data = desired RDP port in hex
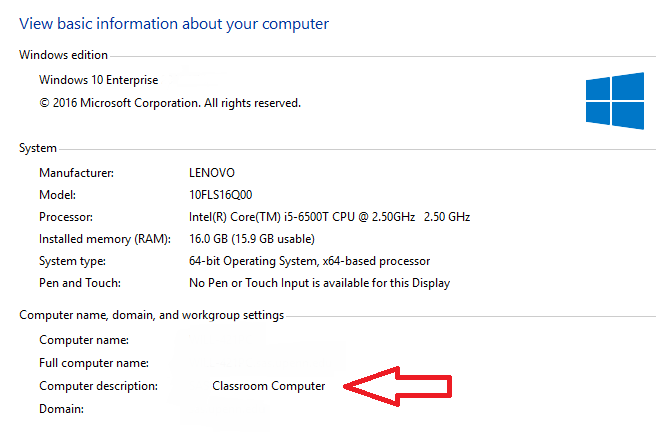
  • Update = HKLM\SYSTEM\CurrentControlSet\Services\LanmanServer\Parameters, Value name = srvcomment, Value type = REG_SZ, Value data = Whatever you want the end users to see in the System properties pane.
  • Update = HKLM\SYSTEM\CurrentControlSet\Control\CrashControl, Value name = AutoReboot, Value type = REG_DWORD, Value data = 0x1

Editing registry settings en masse is a very powerful capability which can fix or create problems nearly instantly. I add a few tweaks to Windows. The first one changes the port number that Remote Desktop (RDP) listens on for connections. The default is 3389. I change that in addition to creating custom a firewall rule for the new port and scoping it to only include allowed IPs. The second entry adds a comment in the “About” section in the Windows System Control Panel applet. The last value forces Windows to reboot whenever it decides to crash and not present the user with a BSOD.

Computer Configuration\Preferences\Windows Settings\Shortcut

  • Update = Target type = Shell object, Shortcut path = %CommonDesktopDir%\This PC, Target object = This PC, Icon path = %SystemRoot%\System32\SHELL32.dll, Icon index = 15, Run = Maximized

Places a shortcut on all users desktops called “This PC” which is similar to the legacy “My Computer” icon of old. I do this for reasons of familiarity.

Computer Configuration\Preferences\Control Panel Settings\Printers

  • Delete = Local printer “Send to OneNote 16”

Windows and Office like to make the OneNote printer the default for everyone. I delete the printer object for OneNote 2016 so installed printers, after the fact, can be the default. I don’t commonly map printers on public computers, but some labs use a Pharos unit for printing and wherever possible, should be the default.

Group Policy-Managed Desktops, Part 2

Public computers require the operating system and application to be out of the user’s way. Providing the defaults for user desktop session on Windows is challenging. Here is what I do to make users can teach their classes, have their conferences, and do their work in our computer labs. The settings I use are extensive, so this post will just cover the computer configuration settings. Part 3 will be for the user configuration. The following is not an exhaustive list of what should or even could be done with a GPO. In the end, resulting policies will be shaped by the needs of the organization.

I break settings down according to GPO so that they may be applied or removed individually without affecting existing functionality that may not need to change. I have a separate GPO each for Windows, Office, Firefox, Chrome and Adobe Acrobat/Reader.

DISCLAIMER – There are a dizzying amount of settings that can be configured in a GPO. Tons. Each setting needs to be evaluated and tested in a lab environment before it is released to production. Changes made to GPOs in an effort to troubleshoot errant behavior should be done one setting at a time. Change – Test – Accept or Revert. A great thing about group policy and its variety of settings is that GPOs can be used in any type of environment.

The Windows 10 GPO

Computer Configuration\Policies\Windows Settings\Security Settings

Local Policies\Audit Policy

  • Audit failures for both account logon events and regular
    logon events

We want to get a record of failed logon attempts on both ends where successive entries
could indicate possible brute force attempts.

Local Policies\User Rights Assignment

  • Allow log on through Terminal Services = BUILTIN\Administrators, DOMAIN\IT Support Group
  • Deny access to this computer from the network = guest
  • Deny log on locally = guest
  • Shutdown the system = BUILTIN\Administrators, DOMAIN\IT Support Group

Anyone coming in over remote desktop should be sanctioned this way. The Windows guest user account should have zero access privileges. Any access to computer resources, local or network should be done with an actual user account. Public computers are expected to be on during stated times of operation. Power-conscious users will shut off a PC regardless of
the next person to come. The last setting here removes the shutdown option from the Start menu. To make this setting be completely effective, the setting “Allow users shut down without logging on” needs to be disabled or else they can just log off and shut down from the login screen. None of this prevents someone from holding down the power button and shutting off that way.

Local Policies\Security Options

  • Interactive logon: Do not display last user name = Enabled
  • Interactive logon: Do not require CTRL+ALT+DEL = Disabled

For obvious reasons we want to not show the last person who last logged into Windows on a public computer. Honestly, this should be configured domain-wide. Brute force attempts through remote desktop will have a better chance of succeeding if they can determine the username last used on the target PC. For familiarity’s sake with what users have been used to doing for decades, I enable CTRL+ALT+DEL. That also opens the lock screen immediately upon the
key presses instead of requiring the user to press any key.

  • Network access: Do not allow anonymous enumeration of SAM accounts = Enabled
  • Network access: Do not allow anonymous enumeration of SAM accounts and shares = Enabled

Anyone requesting access to resources both local and network has to have a bona-fide Windows account. No guests. This way Windows can determine the appropriate level of access from the resource’s ACL.

  • Network security: LAN Manager authentication level = Send NTLMv2 response only, Refuse LM
    & NTLM

We want to ensure the strongest available version of NTLM is used wherever possible, whenever needed. Older apps, not able to use NTLMv2, will not be able function in this environment. Those applications should be upgraded or reconsidered.

  • Accounts: Block Microsoft accounts = Users can’t add or log on with Microsoft accounts

Windows allows users to log in with their Microsoft accounts. Such accounts cannot be managed with Group policy to an effective extent, so I disable the option to do so.

Event Log

  • Maximum application log size 1000000 kilobytes
  • Maximum security log size 1000000 kilobytes
  • Maximum system log size 1000000 kilobytes

The event log can tell us a great about what’s happening on a Windows PC. I opt to make the log’s size 1 gigabyte so there’s plenty of space to record events going far back.

Restricted Groups

DOMAIN\IT Support Group should be added to the local computer’s administrators group (BUILTIN\Administrators) and the local “File and Print Sharing Users” group, for RDP access to PCs running Windows 10. The restricted groups function adds the select groups to the designated group and makes sure they remain members of that group. Any user/group casually added to a restricted group is removed after the GPO is refreshed on the computer. Conversely, groups can be prevented from becoming members of a designated group by using restricted groups.

System Services

Here, group policy can be used to control the startup configuration of Windows services. I make sure the Remote Desktop Services and Windows Update services are set to “Startup Mode: Automatic.” Windows Update should be automatic by default, but just in case someone changes that… Third-party applications that add services to Windows can also be specified here. Adobe’s update service, and Oracle’s java update service are good candidates.

Windows Firewall with Advanced Security

This is the area where the firewall should be configured for Windows 7 and later operating systems. There is another section for the firewall in with the network configuration settings, under administrative templates. Those were meant for 2000, XP OS’s. They’ll still work, but the options in Security Settings are more versatile. I plan on doing a post on just the firewall alone, so I won’t get into it here, but I’ll suggest that the GPO make sure the firewall is enabled (can’t be disabled), and that exceptions for RDP are added and scoped only for IP ranges that are is use only by IT, or those needing to connect that way. Do not open RDP to the whole world for want of DoS attacks through RDP. I would allow the creation of local rules, but not the ability to disable rules specified by the GPO. If the firewall’s configuration is a problem, move to a different OU and see if that helps.

Computer Configuration\Policies\Windows Settings\Administrative Templates

There are a ton of settings here. I’ll try to go through them as simply and concisely as possible. These settings apply to the computer, indifferent of who logs into Windows.

Control Panel/Personalization
  • Force a specific default lock screen and logon image = \\server\share\LockScreenImage.png or C:\Windows\Web\Screen\LockScreenImage.png
  • Turn off fun facts, tip, tricks, and more on lock screen = Enabled

The lock screen can be useful for displaying informational images, or a touch of corporate branding. It is also a great visual indication that a PC is in fact receiving the computer-based GPO settings from the presence of the GPO-assigned lock screen image being displayed.

Control Panel/User Accounts
  • Apply the default account picture to all users = Enabled

I like to swap the default Windows user icon image with a custom one. I just replace the images in “C:\ProgramData\Microsoft\User Account Pictures” with versions of my own for each image using the same names and file sizes/types. I think it makes the whole experience look better.

Start Menu and Taskbar
  • Start Layout File = C:\Path\To\LayoutModification.xml

This setting is great. On a template install of Windows 10, you can set the Start Menu tiles as desired and export that layout to an XML file with PowerShell. The GPO setting makes sure everyone gets the same Start layout, making documentation and troubleshooting easier for IT folks.

System/Group Policy
  • Configure user Group Policy loopback processing mode = Enabled, Mode: Replace

Given that my PCs are used in public environments, I want my GPO to provide the same settings no matter who longs into Windows. Commonly, the user accounts for my clients do not live in the same OU on which my GPO is applied. The loopback function allows the GPO’s settings to apply to users outside of the GPO’s OU. The options are merge and replace. They do as their names suggest. Merge combines the user’s overall user-based GPO settings (collectively), which can be numerous, and combines them with what’s specified in the loopback GPO. In the event of a settings conflict, the setting from the last GPO applied wins. That may not necessarily be your loopback GPO. Replace takes all of the user’s user-based GPO settings and ignores them for what’s specified in the loopback GPO. Use this setting with caution and certainly test it out before release to production.

System/Logon
  • Always wait for the network at computer startup and logon = Enabled
  • Hide Entry points for fast user switching = Enabled
  • Show first sign-in animation = Disabled

Whenever Windows begins to run automated tasks which require connectivity, make sure the network is available. This might lengthen startup and login times by a couple of seconds, but that is better than troubleshooting weird network errors. Generally, my computers only need one user login session at a time. Falling short of this, processes which requires that no users be logged in at the time they run might fail because of one or more persistent session remaining. Fast user switching is fine for shared computers, not the case here. In computer labs and classrooms, user privacy is of a concern when it comes to their data. The best way to ensure this is to make sure none remains after they log off. To this end, each of my user’s profiles are removed when they log off from Windows. Even if they use the same computer several times per week, each login session is new. Watching a first-login animation sequence once is annoying, and completely unacceptable for each login. The animation also slows the login process all together. I turn it off.

System/Power Management/Sleep Settings
  • Allow applications to prevent automatic sleep (plugged-in) = Enabled
  • Allow automatic sleep with Open Network Files (plugged-in) = Disabled
  • Require a password when a computer wakes (plugged-in) = Disabled
  • Specify the system sleep timeout (plugged-in) = 0
  • Specify the unattended sleep timeout (plugged-in) = 0
System/Power Management/Video and Display Settings
  • Turn off the display (plugged-in) = Enabled (3600 seconds)

Most presentations involving a computer will involve some sort of multimedia content. PowerPoint and online videos have become a staple in some classes. Having Windows blank the screen and go to sleep after fifteen minutes is counter to what the instructors have to do in those rooms. I set the display to turn off after an hour of idle time. A simple mouse movement will bring it back.

Windows Components/File Explorer
  • Set a default associations configuration file = Enabled (C:\Path\to\defaultassociations.xml)
  • Start File Explorer with ribbon minimized = Enabled (Never open new File Explorer windows with the ribbon minimized)

Specifying what applications handle what types of files is usually done for everyone by customizing a default user profile the old way of copying C:\Users\CustomProfile to C:\Users\Default. That approach is no longer valid and will lead to more problems in the future. Windows has a way of setting default applications for all users with an XML file and group policy. Simply take an example installation, set the desired defaults and export them to an XML file with PowerShell. I find the new ribbon menu in Explorer quite useful. However, the default behavior to hide until an on-hover event occurs over it with a mouse is annoying. I just show it. All of our users have 22″ screens or larger in their areas. It’ll fit.

Windows Components/Internet Explorer
  • Automatically activate newly installed add-ons = Enabled
  • Prevent participation in the Customer Experience Improvement Program = Enabled
  • Prevent running First Run wizard = Go directly to home page
  • Turn off add-on performance notifications = Enabled
  • Turn on menu bar by default = Enabled

With the introduction of Windows 10, Internet Explorer was superseded by the Edge web browser, which will itself be superseded by a Chromium derivative in the near future. IE11 is still installed on all versions of Windows 10 with the LTSB/LTSC versions only shipping with IE (No Edge). I still set defaults for IE’s configuration despite its near zero-level of use outside of Byzantine web apps which require IE for their functionality. While security is always a foremost priority, I’m aiming to get the user running with IE by reducing the first run prompts. The settings pretty much explain themselves, and are few among a large amount of possible IE GPO settings.

Windows Components/Internet Explorer/Accelerators
  • Turn off Accelerators = Enabled

IE has the capability to use accelerator plugins to enhance its browsing experience. I disable those on the reason that I don’t want unsanctioned code/plugins running or prompting users to run.

Windows Components/Microsoft Edge
  • Configure Start pages = Homepage URL
  • Prevent Microsoft Edge from starting and loading the Start and New Tab page at Windows startup and each time Microsoft Edge is closed = Enabled (Prevent tab loading)
  • Prevent the First Run webpage from opening on Microsoft Edge = Enabled

Now, I have two browsers to configure via GPO. Like IE, Edge’s GPO section is pretty expansive and I only set a few defaults. I set the homepage URL as the start page. I disable the first run webpage from opening as well. I really wish software developers did not do stuff like this.

Windows Components/OneDrive
  • Prevent the usage of OneDrive for file storage = Enabled.

I have nothing against OneDrive or cloud storage. What I’m trying to do here is disable OneDrive’s tendency to download and update the OneDrive application for each new user whenever they log on to Windows. File syncing to online storage is great, just not here.

Windows Components/Remote Desktop Services/Remote Desktop Connection Client
  • Do not allow passwords to be saved = Enabled
Windows Components/Remote Desktop Services/Remote Desktop Session Host/Connections
  • Allow users to connect remotely by using Remote Desktop Services = Enabled
Windows Components/Remote Desktop Services/Remote Desktop Session Host/Security
  • Always prompt for password upon connection = Enabled

RDP is a tremendous help when comes to the fight against having to run around and visit machines for administration. Not everyone should be able to do this, just the PCs used by the IT folks. Scoping access is done in the firewall settings. I don’t want anyone saving passwords for these connections either. I want every remote connection attempt to be individually authenticated each time it is made.

Windows Components/Store
  • Turn off Automatic Download and install of updates = Enabled
  • Turn off the offer to update to the latest version of Windows = Enabled

The Microsoft Store and the way it is implemented on Windows has become a real challenge to administrators. No user has ever asked me for a store app. Ever… I avoid the whole mess. The second option pauses the option to upgrade Windows to the latest point release, another muddy pond of a system. I don’t want point releases going on during the semester, so I turn it off with this and WSUS.

Windows Components/Windows Media Center
  • Do not allow Windows Media Center to run = Enabled

This particularly affects Windows PCs with Windows Media Center (XP, Vista, and 7). My concern here is fielding support calls for people trying to play a video and finding themselves in WMC. Use VLC, or Windows Media Player instead.

Windows Components/Windows Media Player
  • Do Not Show First Use Dialog Boxes = Enabled

Getting rid of the first run prompts for WMP. They’re not a big deal, but never assume the level of experience and end user might have.


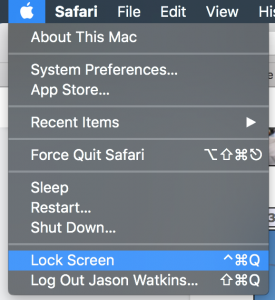
Remove the Lock Screen Menu Option in macOS 10.13 High Sierra

Hello,

I consider privacy and security on one’s computer to be very important. In an age where corporations and organizations seek to enhance their data collection methods from people’s computers through “telemetry”, cookies and targeted advertising, it is still important to stick to the basics. Physical security. It is amazing how many times I see people in all places just walk away from their desktops, with everything open, in full view of someone else. I have long since developed the personal habit of locking my computer’s desktop whenever I walk away from it.

In the Microsoft Windows operating system, the desktop will lock automatically when the screensaver is activated. Microsoft provides numerous ways to manage this particular setting. Then, there is the trusted Windows key + L keyboard command to lock things up immediately.

The not-so-enterprise-friendly folks at Apple did not go through that much to give admins or users too many options like their Windows counterparts. I’ve always added the Keychain access shortcut to my menu bar, which allowed me to immediately lock the desktop from its context menu.

Enter macOS 10.13 “High Sierra”… Among the new additions to macOS was an entry on the Apple menu to lock the screen. Great! Just what I wanted…

Except in public computing environments. Computer labs or classrooms that feature a multiuser setup are not appropriate for locking the desktop. The main reason why is because once the desktop is locked, the only one who can unlock it is the one who locked it in the first place. With classrooms and labs that person is long gone by the time the locked desktop becomes a problem.

Ideally, the fix for this would entail editing a plist somewhere or the application of a configuration policy. Unfortunately, neither of those will work. Configuration policies can remove Shutdown, Restart and Sleep, but not the Lock Computer (yet). I think macOS Server hasn’t caught up with the client yet. While Apple is removing features from Server, maybe they could add a provision to remove the Lock option. Then, we would not have to do the following.

Making this change is not easy or simple for two reasons. The first is System Integrity Protection (SIP) which prevents changes to system files no matter whom you are (root included). The second is that the file we need to edit is buried within the System folder, under a path that will fill a whole line of your terminal window. We’re also going to need a decent text editor. Don’t use TextEdit.app which ships with macOS.

SIP can be disabled from Recovery mode. Reboot the Mac while holding down Command + R. From the recovery environment, open the terminal and enter:

csrutil disable

Reboot the Mac normally and all will be the same, just without SIP obstructing our work.
Next, is to open the Finder or the Terminal, whichever is preferred and naviage to:

/System/Library/Frameworks/Carbon.framework/Versions/A/Frameworks/HIToolbox.framework/Versions/A/Resources/English.lproj/StandardMenus.nib/objects.xib

Copy objects.xib to your desktop or some other place outside of where the original is located. Don’t edit the original! We’ll make a backup copy of the original and edit that, then copy our hacked version into where it belongs.

Objects.xib is an XML file with a ton of entries. Open up the text editor on the copy of objects.xib and search for “Lock Screen”. Remove the whole block of code encompassing the Lock Screen menu item. It will be a few lines. NOTE that there is an id tag within that block of code that is to be removed, tag 311. This also has a separate entry which has to be removed as well. If it is not removed, macOS will still think the Lock Screen entry is within the objects.xib and freeze, breaking the Finder (experience talking). Make sure no more entries for “Lock Screen” and “311” are in the file. Then, save and close.

Rename the original objects.xib file and paste in the modified version under the original name. File ownership needs to be fixed to equal that of the original objects.xib file. Run chmod root:wheel objects.xib from a root session in the terminal (sudo su). The actual permissions should be fine.

Reboot the Mac back into Recovery Mode and re-enable SIP by executing csrutil enable from the terminal, followed by another reboot.

Drum roll… Log in and Lock Screen will be gone. Now, no one will be able to lock the screen from the Apple menu. This procedure does not prevent someone from locking with the keyboard combo. I suspect a fraction of a percent of Mac users actually know that combo from regular use.

Enjoy!

Building an image of Windows 10 for mass-distribution

Hello,

This post is a follow-up or compliment to creating an image of Windows for mass-distribution (Windows 7). On that note as well, the folks over at Deployment Research have a great post on creating an updated Windows 7 master image with MDT, very helpful.

This summer, Windows 10 is upon us, and we have already begun slowly transitioning some areas to Microsoft’s ultimate operating system. Largely, the process of making an image for Windows 10 is the same that is was for Windows 7 with a few twists.

Tools…

I like to build my images in a virtual machine. This approach allows me to create an image that is truly hardware-neutral. Using actual hardware could work, but there still may be remnants of that hardware that sysprep does not generalize, and could potentially make it into production. The actual hardware approach worked for Ghost, but it is not necessary anymore with MDT. Choose whatever virtualization tool out there, they all work very well, some are even free. Here’s the best of what’s around:

  • VMware Workstation/Player – Not free, but feature-rich and integrates into vSphere.
  • Microsoft Hyper-V – Comes with x64 server versions of Windows (2008 and later), and x64 desktop versions of Windows 8 and later. Despite all of the “server” nomenclature, client operating systems will work just fine.
  • Oracle VirtualBox – Free, and available for Windows, macOS, and Linux as both the host OS and the client OS.

I am aware that there are virtualization products for macOS, and Linux, but we’re working with Windows. I think it is best to just stick with that for the whole process. I’m sure everything would be fine if Windows was not the host operating system.

Given that, you’re going to want to do this work on a moderately beefy PC. Not all of us have Dell Precision workstations, or even access to a server with Hyper-V or vSphere installed, but using an under powered PC will make building images, and just using virtualization a slow and miserable experience. The key is storage. Creating images, multiple images with snapshots, and testing uses up a great deal of space on the disk drive(s). I would not bother using a drive smaller than 1TB. It’ll work on something smaller, but in that case, you are limiting the whole process. Even 1TB SSDs are reasonably priced now. SSDs are king, but still not equal to spinning disks in price per gigabyte. A combination of something like a 256GB SSD for the host operating system and applications with a 4TB spinning HDD for storage would work well. RAM is also very important because, when using VMs, RAM is being used by both the host and guest operating systems, at the same time. Try to max-out what your PC will take. 32GB, 64GB of RAM is not unreasonable for this type of work.

Modern CPUs are plenty powerful for many tasks, virtualization too. Intel CPUs have extensions specifically for virtualization. Quad-core CPUs should be a pre-requisite for a host PC that will do virtualization. You could use a dual-core CPU, but recall the part from above about under powered PCs and virtualization. If you can get a CPU with more cores, 6, 8, great! Xeon CPUs are really nice. I wouldn’t bother with anything under a quad-core i7. Another thing to also consider, that is sometimes overlooked, is bus speed. You could have the fastest CPU with many cores, a ton of RAM, working off a sweet 2TB SSD, but if the bus that connects all of these devices together is small, all you are creating is a digital traffic jam. NVMe, and M.2 SSDs are slowly replacing SATA-based SSDs and spinning HDDs in consumer and business PCs. They offer a significant increase in throughput and speed for data storage. DDR4 memory is the latest and greatest in RAM technology, until 2020, when DDR5 is expected. It is not the cheapest, but DDR4 outperforms all of its predecessors. Obviously, you want to get the best set up you can, but I understand budgets have limits.

Virtual Machine Settings…

This can vary from place to place, but I would use at least 4GB of RAM, one vCPU with 2 cores, and a 128GB VHD. That has worked well for me with Windows 7 and 10. If you can give the VM 8GB of RAM, do it. The smallest disk drive we have out there is a 128GB SSD in some Dell OptiPlex 9020s we purchased in 2014. When finished, my image has a disk footprint of around 70GB (35GB compressed by dism). If the new image will be small, then a 64GB VHD is fine. That is as small as I would go. It is possible to squeeze an image of Windows 10 (plus updates), Office 2016, Adobe Reader, Chrome, VLC, and AV software onto a 32GB drive, it is a tight squeeze. Windows grows in size over time, and 32GB will be gone long before you even realize it. I’m starting to think 32GB is too small for an iPhone… The virtual NIC should be configured for NAT, and not bridged to the production network. We’ll have a fresh install of Windows, straight from the ISO, and temporarily unpatched. The image should not see the production LAN until it is ready for testing (patched), or ready for use.

OS Installation…

After the guest VM is created for the new image, connect its virtual CD/DVD-ROM drive to the ISO file for Windows 10. In VMware Workstation, new VMs, with no OS installed, automatically boot to the virtual CD/DVD-ROM by default.

Follow the on-screen prompts to install Windows into the VM, but STOP after the first reboot from install/file copy to OEM/Windows setup. Setup will stop at that point, and wait for user input. There, we’ll use audit mode to finish setting Windows up the way we would like it. I have more information about installing Windows 10 in a separate post.

Press control + shift + F3 to reboot into audit mode.

STOP at this screen!

To get into audit mode, press control + shift + F3 all at the same time, like the three-finger salute (control + alt + delete). Windows will reboot, and automatically log in as the built-in administrator account, and will continue to do so, no matter how many times you reboot, until sysprep is run. Here, we’ll customize Windows 10 as desired, then run sysprep with an unattend.xml file that copies our profile over to the default (CopyProfile).

From within your virtual machine software, take a snapshot of the VM, at this point.

Most corporate or “work” PCs have Microsoft Office installed along with Windows and other common programs. Microsoft/Windows Update is used to update both Office and Windows. At this point, I install Office (silently with a MSP file), and enable Windows to update other products in addition to itself. This is done from the new Settings application \ “Updates & Security” \ “Advanced options” \  “Give me updates for other Microsoft products when I update Windows.”

The above setting has to be enabled for Windows to update Office too.

Once that is set, run updates on the new VM until there are no more left. The later the build of Windows 10, the fewer updates will be required. Microsoft Office 2016 has been available for some time, and has a decent amount of available updates online. Once the updates are finished, shut down the VM, and take another snapshot.

Some basic applications, which are not included with a regular install of Windows, are utilities that other applications use. Applications like the various Visual C++ Redistributables (VCPP), Microsoft Silverlight, and Updated .NET Frameworks (4.5/4.6). These are easily found online, and can be installed silently. The Deployment Research site has a script that gathers all of the C++ Redistributables together, and installs them, silently, in one script.

Download the VCPPs from the Microsoft website (both x86 and x64), and move them to a folder structure named as follows: (#### = the date for the VCPP application, 2005-2015)

Source \ VC#### \ vcredist_x64.EXE

Download all of the VCPP apps for x86 and x64 versions 2005, 2008, 2010, 2012, 2013, and 2015 and arrange them like above.

The script to install all of these can be found here.

Silverlight is also freely available from Microsoft’s website.

Next, is to install all of the regular applications that people use every day. Web browsers like Google Chrome, or Mozilla Firefox, PDF readers like Adobe Reader, or SumatraPDF, communications application such as Skype or Zoom, and multimedia apps like VLC, or iTunes. I download, and store the applications I intend to use on a server share, then use silent install scripts to install them on Windows 10, which is still in audit mode.

Some basic silent install commands for common applications. If you’re in for more details, check out ITNinja.com. They have a compendium of unattended and deployment-related information for many applications.

  • Adobe Reader: msiexec /qb /i AcroRead.msi TRANSFORMS=AdobeReaderDC.mst
  • Google Chrome Enterprise: msiexec /qn /norestart /i “GoogleChromeStandaloneEnterprise.msi”
  • Mozilla Firefox: FirefoxSetup.exe -ms
  • VLC: vlc-2.2.1-win32.exe /L=1033 /S /NCRC
  • Java (if you must): jre-8u66-windows-x64.exe” /s JAVAUPDATE=0 AUTOUPDATECHECK=0
  • Notepad++: npp.6.8.7.Installer.exe /S
  • 7-Zip: msiexec /q /I 7z920-x64.msi

Ninite.com has a site that will create a wrapper as an executable that will download whatever freeware is chosen and install them. All in one go.

Keep in mind that the fewer applications that are placed into the image, the longer that image will stay relevant. MDT/SCCM can deploy applications in addition to the OS itself. Products like Adobe Flash Player, and Adobe AIR change so often that I just install them when the image is deployed.

Run each of the newly-installed applications and configure them as desired. Shut down, take a snapshot, then reboot and let Windows 10 continue in audit mode.

To save time and effort in configuring Windows the way I need it, I try to automate as much as possible. Scripting the basics and eliminating the redundant and repetitive tasks can save a lot of time and prevent unnecessary mistakes.

Creating user accounts – I typically make a local user account for administrative use and for general use in case the domain is somehow unavailable.

First, I create a local folder to contain log files and other goodies, then hide it. “C:\Stuff” in this example.

mkdir C:\Stuff

attrib +h C:\Stuff

echo Creating local user accounts

net user pcadmin * /add /comment:”Local admin account” /passwordchg:NO
wmic useraccount where “name=’pcadmin'” set passwordexpires=FALSE
net localgroup “Administrators” pcadmin /add

net user pcuser * /add /comment:”Local user account” /passwordchg:NO
wmic useraccount where “name=’pcuser'” set passwordexpires=FALSE
net localgroup “Guests” pcuser /add

echo Local user accounts created on %date% at %time%>>C:\Stuff\Windows-10-Config-Script.txt

The asterisk (*) after the username will prompt for the new user’s password instead of coding it into the script and leaving it for prying eyes. The last command (echo…) will create a text file and add the text between echo and the first >. The double >> will just add the text to an existing file should that be the case.

To keep from surprising users with new builds or versions of Windows 10 through Microsoft Windows Update, I set a registry key to disables Windows upgrades through updates.

reg add “HKEY_LOCAL_MACHINE\SOFTWARE\Policies\Microsoft\Windows\WindowsUpdate” /v DisableOSUpgrade /t REG_DWORD /d 1 /f

echo Windows 10 version upgrade disabled on %date% %time%>>C:\Stuff\Windows-10-Config-Script.txt

The next thing I want up and running right off of the bat is remote desktop.

echo Enabling RDP with SASC alternate port
reg add “HKEY_LOCAL_MACHINE\SYSTEM\CurrentControlSet\Control\Terminal Server” /v fDenyTSConnections /t REG_DWORD /d 0 /f
reg add “HKEY_LOCAL_MACHINE\SYSTEM\CurrentControlSet\Control\Terminal Server\WinStations\RDP-Tcp” /v “PortNumber” /t REG_DWORD /d “0xdesired_port_number_in_hex” /f
netsh advfirewall firewall add rule name=”Alternate RDP Port” dir=in action=allow protocol=TCP localport=desiredportnumberinbase10

echo RDP enabled with SASC alternate port on %date% at %time%>>C:\Stuff\Windows-10-Config-Script.txt

A facet of Windows’ default configuration is to hide file extensions. I can guess the designers at Microsoft figured doing so might be helpful to end users, but in practice I have found it to be anything but for most people. I inject a quick registry change to show those pesky extensions .

reg add HKCU\Software\Microsoft\Windows\CurrentVersion\Explorer\Advanced /v HideFileExt /t REG_DWORD /d 0 /f
echo Windows file extensions shown on %date% %time%>>C:\Stuff\Windows-10-Config-Script.txt


This next part of the script is entirely optional. I don’t recommend activating Windows or Office until it is ready for the end user. A caveat in configuring a default user profile, even using Windows in audit mode, is that Windows cannot be personalized until it is activated. That means you will not be able to configure a wallpaper, screensaver, desktop icons, or color theme. I don’t find that to be a big deal as most of those items can be configured through a post-deployment registry tweak or with Group Policy. However, if those items are to be included with a custom default user profile during sysprep, activate and make the necessary changes. Then, add this to the script.


REM Try KMS activation first. If that doesn’t work, try MAK activation.
cscript C:\Windows\System32\slmgr.vbs /skms kmsserver.company.com:port
cscript C:\Windows\System32\slmgr.vbs /ipk THEWI-NDOWS-10KMS-PRODU-CTKEY
cscript C:\Windows\System32\slmgr.vbs /ato
if %ERRORLEVEL% == 0 echo Windows activated by KMS on %date% %time%>C:\Stuff\Windows-10-KMS-Act.txt
EXIT
else
REM If KMS is not available, use an MAK to activate.
cscript C:\Windows\System32\slmgr.vbs /ipk THEWI-NDOWS-10MAK-PRODU-CTKEY
cscript C:\Windows\System32\slmgr.vbs /ato
echo Windows activated by MAK on %date% %time%>C:\Stuff\Windows-10-MAK-Act.txt
       EXIT


If Windows was just activated, shut down, take a snapshot, then reboot and let Windows 10 continue in audit mode.


Custom Default User Profile…


Prepare the default user profile, the built in Administrator account, in the way the end user should have it. I would be cautious when running applications under this account to answer any first run prompts. Windows 10 does more during a user’s first login process than it did with Windows 7. These changes lengthen the amount of time it takes a new user to log in for the first time. As applications are run and settings configured, the user profile grows in size, quickly, going from 2MB to 500MB without doing much. This default profile is copied over from C:\Users\default each time a new user is brought on to Windows. The larger the profile, the longer the copy process will take and lengthen an already long login process. More and more I have sought ways to provide default user settings through group policy and our endpoint management platform, BigFix.


If a VM snapshot hasn’t been taken in a while, take one now and certainly before sysprep is run in any fashion.


In order for sysprep to copy the customized user profile we have configured to the default, replacing what Windows provides, there can only be one profile on Windows at the time sysprep is run. If there’s more than one profile, sysprep won’t copy anything. Delete any profile from Windows, through the System applet, except for the customized profile. This also ensures that everyone who logs into a PC with this image of Windows installed will get the customized profile.


Next, create an unattend.xml file with the Copy Profile option set to true. Unattend file creation needs to be done on another, separate install of Windows 10 that is running the exact same version of Windows 10 for which the unattend.xml is being made. Copy the unattend.xml file over to the VM (C:\Windows\System32\sysprep) which is about to be sysprepped and run:


sysprep.exe /oobe /generalize /shutdown /unattend:C:\File\Path\To\unattend.xml


Sysprep will take its time and do its thing to generalize Windows and shut down. Take another VM snapshot at this time and power-on the VM again. Windows OOBE will run as if it were a new PC obtained from an OEM or a vendor. Create a bogus user account to complete the OOBE process and get to the Windows desktop. Log off of the new user account and log in as the BUILTIN Administrator (It should be listed at the bottom-left portion of the login screen). Delete the new user account, created through OOBE, and confirm that the resultant user profile being given is what the end user should have. Take yet another snapshot of the VM. Once it is, capture the image with the imaging tool of choice. We use the Microsoft Deployment Toolkit (MDT). To capture an installation of Windows into MDT, connect to the deployment share with the Run dialog from the installation of Windows that is to be captured. No need to reboot into an MDT Windows PE USB drive.


\\mdtserver.company.com\deploymentshare\Scripts\LightTouch.vbs


Select the Sysprep and Capture task that was made to create an image of Windows 10. The task will also sysprep Windows and reboot into Windows PE and perform a capture, creating a WIM file in the deployment share’s “Captures” folder. Leave the VM alone, and let things take their time. Depending on the size of the install on the VHD, it could take an hour or more. A behavior specific to the 1709 builds of Windows 10 is the tendency for Windows, after being sysprepped in an MDT capture task, will not reboot into Windows PE. It would just go back into Windows again, skipping the capture entirely. To fix this, I’ve had to make sure that the VM’s virtual CD/DVD drive, mapped to the MDT Windows PE ISO file, is the first item on the VM’s boot sequence. Hyper-V will remove the virtual CD/DVD drive from the top of the boot order, and replace it with the Windows Boot volume from the VHD. In VMware Workstation, I have to edit the VM’s VMX file to include a boot delay, which give me time to interrupt the boot sequence and redirect it as desired. Just add:

 
bios.bootdelay = 20000
 

to the VM’s VMX file and it will wait 20 seconds before completing the default order in the boot sequence, which is more than enough time to stop it, get into the virtual BIOS, and switch boot devices. Providing one is paying attention…


Enjoy and happy imaging!
Group Policy-Managed Desktops, Part 1.

Hello,

Administering classroom computers is an exercise in uniformity. My mandate is to make the end user experience identical in any classroom a professor might teach. The options to standardize settings are two-fold, curate a custom default user profile in Windows, or use Group Policy.

Microsoft introduced Group Policy to Windows 2000 when that product was still in beta. Group Policy allowed administrators to specify and enforce any setting available to them in the policy. As Microsoft progressed in developing Windows, Group Policy followed bringing more options to administrators. Every domain-joined Windows computer and domain users are subject to several group policies without any specific changes being made. Windows Active Directory (AD) domains come with two default Group Policy objects (GPO). Starting with Windows 2000, every “Professional” or “Enterprise” version of Windows which was based on the NT kernel came with a local Group Policy object. Anything that can be set in a registry key, can be set through Group Policy. Windows Server 2008’s version of Group Policy introduced the ability to specifically set preferences for Windows and its users along with the regular policies.

An administrator can completely control Windows desktops and servers through a Group Policy object. Software using MSI installers can be deployed with Group Policy. When set up correctly, Group Policy can be a very handy administrative tool. If it is set incorrectly, Group Policy can be a challenge to troubleshoot and fix. The effects of a GPO are widespread and can apply to every computer or user in the domain or an OU just as easily. A desired change can spread just as quickly as a detrimental mistake through a GPO. Most important of all, a good GPO can end the days of admins having to visit each computer to change settings en masse.

The basics of Group Policy are simple to understand. Any user or computer underneath the scope of the GPO will receive the settings specified. Despite the name, Group Policy does not directly apply to groups, though it is possible to configure it that way with application permissions. Normally, objects being managed by a GPO must live in an object under that GPO whether it is a domain or an OU. There are exceptions to this, but we’ll hold off on that for now. Since a single Active Directory object could theoretically have several GPOs applied at the same time, GPOs have an order in which they are applied.

First, any and all settings from the local GPO are applied to all users and that one computer. Local GPOs only affect the computers on which they’re stored. This is the only way a user or computer not joined to an Active Directory domain will receive settings from Group Policy. Local GPOs are helpful if an AD domain in not in use or available. However, I do not recommend their use in AD domains because their change has to be done at the local level. Then, admins are back to running around. I’d use a local GPO to enforce settings that I know will never ever need to be changed. The number of possible settings that would fall under that description are pretty small. A good example is the GPO setting that enables/disables Windows 10’s sign-in animation. I always disable it. No one likes or appreciates Microsoft’s new animated approach to a first-login progress bar.

Second, is the Active Directory Site. As much as a Site would seem to equate to a physical location, it does not. AD Sites are groupings of domain controllers (DC) either from within the same domain or from multiple domains in the same AD forest. Sites are purely for configuring replication policies. Active Directory replication is automatic within a site (default). Replication across sites is not automatic at all and must be set up manually. I have never needed to use a GPO at the site level outside of a test lab, ever…

Third, is the Active Directory domain. Every AD domain within an AD forest ships with two default GPOs, the “default domain GPO” and the “default domain controllers GPO.” The domain GPO lives at the root of the domain while the DC’s GPO is attached to the domain controller’s OU. They are the only default GPOs Active Directory provides. They’re not the only GPOs possible within Active Directory. Many many more GPOs can be created at the domain level for whatever reasons the administrators decide is best. Settings which are appropriate for every computer and user in the domain, DCs too, are best at this level. Those settings are often not too specific in every example, but can be very helpful in providing a baseline configuration that all computers should have. For example, the Windows Firewall’s setting of “protect all network connections” can be enforced for every computer in the domain, including sub-level OUs. Any required firewall rule exceptions can be defined in that same GPO. Antivirus software or endpoint management client software can be deployed with Group Policy at the domain level. As soon as a new computer joins the domain, it gets the assigned software if the software is not already installed.

Lastly, the Organizational Unit (OU) is the final place a GPO can be applied. All GPOs, no matter where they are applied, have the same settings. At the OU level, configurations can become very specific. This design can level down with OUs having sub-OUs, each with their own GPOs. The settings here are good for one particular group of users or computers can be placed within an OU and administered as necessary. This how I organize my classroom computers in our domain. I have it set that any Windows computer that is placed in the classroom OU can be working as such without any local modification necessary.

All settings from all assigned GPOs will apply to a user or computer in the order of local, site, domain and OU. In the event of a conflict in settings between GPOs, whether from GPOs at different levels or from the same level, the setting from the GPO applied last wins. There are, of course, exceptions to this rule, but we’ll deal with that later.

What will be the best way to approach a GPO to configure your end user’s computers is determined by figuring out what should be controlled and how to provide that configuration. Some settings can be configured and built into the operating system image. This is a fine option, but it lacks versatility. Suppose the configured setting’s requirement changes or the determined setting was incorrect. To remedy this, a new image must be created and those computers already-deployed with the previous image will need to be fixed. The same setting deployed with a GPO would just need the proper adjustment in the GPO. No new image needed. No visiting end user computers or concocting exotic repair scripts.

The latest work I have done with Windows 10 shows that an image without a pre-configured custom default user profile has the quickest login time for new users. In a classroom environment, fast logins are very important. End user profiles are not kept on classroom computers for reasons of privacy. Every time someone logs into one of my classroom computers, they are doing so for the first time whether they have done so in the past or not. A login time of 90 seconds can be tedious for a 45 minute class. The recipe to ensure fast logins is to not modify the default user profile. Let the Windows default profile (2-5 MB in size) be what everyone gets. How then are the settings end users need provided to them? Group Policy. I use Group Policy to control the behavior of the Windows 10 operating system, Microsoft Office 2016, Mozilla Firefox, Google Chrome, and Adobe Acrobat Reader DC. Everything from what the user sees on the login screen to the default file type associations are set by a GPO.

The next steps are to compile a list of all the desired configuration settings and then map them to their respective GPO settings. If a GPO setting does not already exist for the changes trying to be made, see if a GPO template is available, or use Group Policy to distribute a registry edit which will change the desired setting. Group Policy is extensible. Each time Microsoft releases a new build of Windows, new GPO templates come with it. Third party software vendors such as Adobe and Google graciously make GPO template files available for their products. By default, Group Policy will only cover the Windows operating system. To manage Microsoft Office or any other product, the proper GPO templates have to be added to a Group Policy Central Store, which is configured on a DC, manually, by administrators.

Given how easy it is to change settings for Windows through Group Policy, a small mistake has the potential to become a large problem quickly. I practice due diligence in this respect and test every desired GPO change in a dedicated test environment before it is implemented on the production network. No exceptions… If you’re new to Group Policy and have little to no understanding of it, leave it alone until a rudimentary understanding is held. There are ample resources for learning Group Policy online. Try all GPO-related ideas in a test environment. Make sure the test environment is a representation of the production network. The closer the resemblance between the test network and the production network, the more accurate test results will become. There should be as little room as possible for surprises from a GPO setting implemented on the production network that was implemented successfully during testing.

Once a concise list of the settings needed to give the end user the desired environment is compiled, implementing in a test environment is the next step. Depending on the starting point, the settings can be few or they can be extensive. To make GPO management simpler and to not reproduce identical settings in other GPOs elsewhere, I create my GPOs to do one or two specific things. A giant, all-encompassing GPO, which sets everything desired, is compact but not always the best idea. A GPO with dozens of configured settings is difficult to troubleshoot. Several changes will need to be made/unmade to that large GPO to see which one in particular might be the problem. On the other hand, a GPO dedicated to configuring Microsoft Office, Mozilla Firefox, firewall settings, Remote Desktop settings can be applied/unapplied wherever needed and tested much easier. Testing one change at a time is more productive than testing several at the same time and hoping they all work. In the event that a GPO has to be unlinked from its assigned OU, only those settings are removed. All other working settings remain applied from other GPOs. Maybe after a period of successful implementation with no instances of GPO-induced problems, all settings could be rolled into one “known good settings GPO” and applied.

In the next part, I’ll detail the exact settings I use to provide my users with the desktop experience they need to teach their classes without technology getting in the way.

Thank you


Time Shifting Part 2

Hi,

A few months later, we’re still at an impasse over how and why Windows 10 Enterprise 1607 x64 loses time on the taskbar’s clock. Part 1 detailed the problem and some of my early attempts to fix it. Many of my colleagues are surprised when I tell them about this problem and often have no idea why. The first response is “check the BIOS/CMOS battery” (first thing I did), then ask “What are the NTP settings? (default).”

One lead which brought forward some interesting information was the health of the SSD in one of the affected computers. After running the Intel SSD utilities on the drive, it was over tolerance in the read/writes dept. In the span of two and a half years, the 180GB SSD wrote 37TB of data to the drive. The drive’s health was “good” but over tolerance. That figure seems large to me, but considering that we wipe user profiles at logoff and every user gets a new profile every time they log in, it makes sense. The default user profile is around 500MB in size. The login process occurs on an average of 5 times per day (MMV), five days per week (sometimes six), 39 weeks per year. This is just logging in and logging off, not considering Windows updates, AV definitions, whatever BigFix writes to the drive and any other Windows processes.

Aside from the time shifting issues, Microsoft Windows 10 runs fine, albeit under strict control. While this problem seems intermittent, it is easily dealt with by the end user. Simply, move the mouse, or perform a key press, and the screen will refresh to the correct time. Students taking exams or performing timed assignments were the first to notice the time-shifting problem. Several websites are available that show a clock on the center of the page, along with some ads. Their text is much larger and easily seen by students, including those in the back rows. During my exams, some professors would show these types of webpages or use a watch or the clock on their smartphone as a timer and would announce the time remaining at thirty or fifteen minute intervals.

These alternatives are suitable for the time being, despite the fact that the builtin Windows clock should be a reliable time source without any question. Going forward, I’ll continue to monitor the progress of this issue and hope that build 1709 or 1803 brings one of those silent fixes.

Thanks!

Time Shifting Part 1

Hello,

We’ve been using Windows 10 in our public spaces for little over a year now with widespread use enacted over the summer. Adoption was positive. No one came out with torches and pitchforks as I had feared.

That is not to say we were not completely without issues. The strangest of which was a habit noticed by some users of the Windows clock, the one in the system tray, freezing or losing time. This became an issue when faculty were giving tests and using the PC’s clock to time the exam. Students were being shortchanged on the apparent time.

My first thought was to check the BIOS’ clock. I make sure that is right before I image the PC for the first time. There is a bunch of changes I make to a new PC before it is imaged and brought into service. The oldest machine exhibiting symptoms is just three years old. The CMOS battery should not be going yet. It’s possible, but not probable. As expected, all was fine.

The time zone is correct (EST vs. PST). Windows setup defaults to Pacific time (GMT -7:00) for Redmond, WA.

The computers can get their timing from one of several sources. By default, Windows 10 will try to sync with Microsoft’s time server (time.windows.com). Computers on a Windows active directory domain can get their time from the domain controller (DC) that holds the PDC Emulator FSMO (the first DC in the domain by default). A group policy object (GPO) can be used to control the complete operation of the Windows NTP client, including which server to use. Lastly, the option exists to inject the NTP settings directly into the registry.

I typically use a GPO to point our Windows clients to the university’s own NTP servers. Simple. To test NTP connectivity to the NTP server, execute the following in a command prompt.

w32tm /stripchart /computer:us.pool.ntp.org

The affected clients were all set to the correct time, and they were using the university’s own time servers, which I am positive are correct. What gives?

The Event logs on Windows were not showing any indicators of failure around the reported times the displays froze. Another thought was that the Crestron display systems we use in the classrooms was freezing the output to the monitor/screen as a power-saving measure of sort and thus not showing the clock’s progression. It wouldn’t be unheard of for Crestron to skew something in Windows. We’ve had numerous issues with audio output in these circumstances. I tested out the classroom Windows 10 image on identical hardware in my office sans the Crestron system and it the clock froze. Crestron cannot be the culprit, at least in this case.

So, despite my concerted attempts in every job I have ever held to not be a clockwatcher, I am in this case… To demonstrate and test for this issue, myself and others (if interested), log into a PC as a regular user and watch for the clock to not change when the time on our phones or watches does.

Is it the image of Windows 10 that we are using? Before deploying Windows and software to our classroom computers, we perform a heavy series of changes to ensure that everything works and that an instructor will get the exact same computing experience no matter which classroom from which they are teaching. Profile customizations…

I took a classroom computer (Lenovo M93/M900 “Tiny”) and installed Windows 10 on it from the Microsoft ISO. I then used our endpoint management software to install most of the software we use in the classrooms. Some titles are too big to be deployed in this manner. I’m writing about you MATLAB and you SAS. This all took about a day with little input from me. I joined the domain, placed the computer in the same OU as the rest of the classrooms and logged in as a regular user. No clock changes. The time kept up in the task bar until our auto-logoff settings took effect.

So, it is the image? The next question is what in the image is the problem? The list of customizations and changes we make is several pages long and gets smaller every year. We use a domain-based group policy to provide the overall configuration profile to classroom users. From the desktop environment to power settings and everything in-between group policy is the driver of the end result. Local GPOs are helpful, but not in examples of mass-deployment. The only thing we set in the local GPOs are those that we are certain we will never ever need. The truly onerous, useless features or settings that Microsoft includes for who knows what reason. That approach takes a great deal of work and testing to achieve a reliable and desired state configuration.

The version of Windows 10 we piloted in a couple of computing labs, initially was the first RTM version (1507). No problems aside from UI issues some users did not like. When taking Windows 10 to the next level, our 200+ classrooms, Windows 10 “Anniversary Update” (1607) was the latest available in Microsoft’s Software as a Service design (SaaS). Our pilot encompassed two labs of about sixty computers in total. If there were a time-related issue, I am sure I would have heard about it at some point.

Either way, where it stands now the problem IS with Windows 10 Enterprise x64 1607 and group policy for our domain. I’ll update with more information when it becomes available.