
Microsoft Office is probably the flagship product for Microsoft, aside from Windows itself. There are more installs of Office out there than there are installs of Windows (all versions). Microsoft Office is available for Windows, Mac OS X, iOS, and Android. Enterprises use Office to such an extent that a computer isn’t really useful without Office installed.
Deploying Office to multiple computers over the network, at the time of imaging, or after, is a made simple with the use of an unattended install file (MSP). These files are created using a tool built in to enterprise releases of Microsoft Office. Consumer builds of Office, Office 365, do not include this tool, the “Office Customization Tool.”
To run the tool, execute the Office setup.exe command with the “/admin” modifier/switch.
setup.exe /admin
If Office has been imported into MDT, the application’s property sheet contains an “Office Products” tab where the customization tool can be launched. The tool contains no wizards, just an explorer-style interface with categories to the left and individual settings to the right.
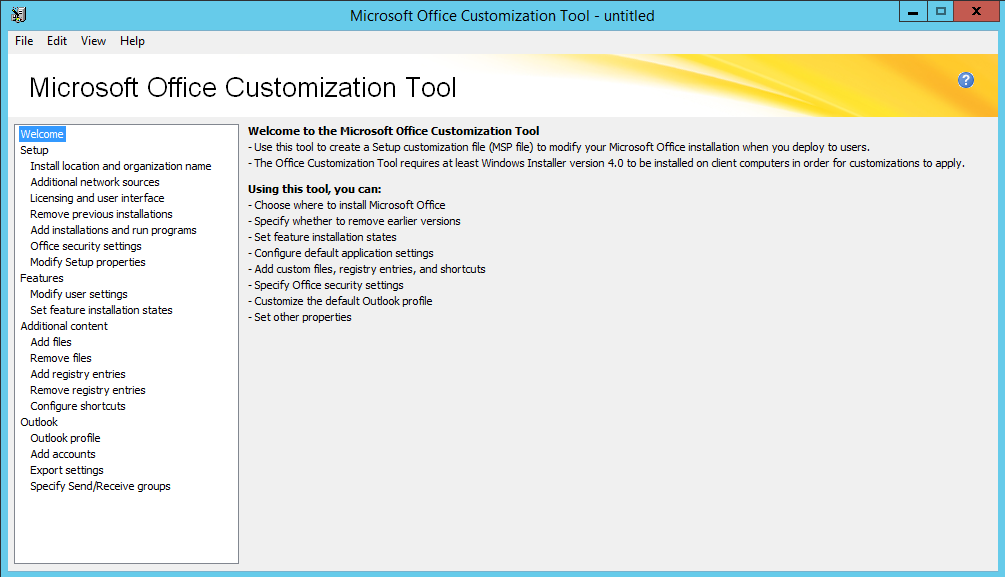
The welcome page for the Office Customization Tool, which comes with Office 2016.
There are a dizzying array of settings that could be configured with the tool, but only a few stand out to make deployment easier across the enterprise. During any Office deployment, the product key, registered user and organization, and product activation must be considered into the process to prevent prompts for end users, and reduced product functionality.
First is the “Install location and organization name” setting under “Setup.” The default install location is fine, just enter the appropriate organization name.
Next, is the “Licensing and user interface” settings a couple of lines down. Select the appropriate licensing scheme for your organization, accept the licensing agreement, and choose the display level of “None” with the “Suppress modal” check box selected.

Choose the correct licensing and make sure to suppress any dialog boxes that may appear during the install.
Go to the “Modify setup properties” a couple of lines down. Here, we need to add two settings that will allow Office to auto-activate and prevent setup from rebooting the computer. The two properties are called “AUTO_ACTIVATE” and “SETUP_REBOOT.” SETUP_REBOOT is simply set to “Never”, and the AUTO_ACTIVATE option is set to 1.

Add the two settings illustrated and their prescribed values.
Under the “Features” section, choose “Modify user settings.” This will change things for the end user experience in Office applications. The settings we’re focusing on are the “Microsoft Office 2016 \ Privacy \ Trust Center \ Disable Opt-in Wizard on First Run“, and “Microsoft Office 2016 \ First Run \ Disable First Run Movie/Disable Office First Run on application boot.” these will get rid of the annoying first-run prompts a user sees whenever they open Office for the first time. Who actually a thought a movie would be what a user wants to see the first time they run Word?

Turn off all of the annoying first-run things that Office throws at the user.
Next, choose the option underneath “Set feature installation states.” This is where Office would ask what components should be installed. The computers I administer are in public locations, like classrooms, so Microsoft Outlook is not needed.

Choose what you do not want installed with Office.
The last thing I do is create desktop shortcuts for Office applications. Choose the “Configure shortcuts” option under the “Additional options” section. Click the “Add” button to create a new shortcut. Choose the desired application for the “Target:” value. Choose the value “[DesktopFolder]” for the “Location:” property. One thing that must be done or this will not work is to add an open bracket “[” to the “Start in:” field. If this is not done, an error stating the start in folder is invalid will appear.

Create new desktop shortcuts the users should have for their Office applications.
We’re done! Now, the settings must be saved into an MSP file and placed in the “updates” directory of the Office installer. Choose “File” \ “Save as” from the menu at the top and choose a name for the MSP file. Microsoft recommends placing the numeral “0” at the front of the file’s name to guarantee it is the first to be read when Office is installed. Save the file in the updates folder of the Office installation directory. Now, each time setup.exe is run from that Office media, the setup parameters selected will be applied.
Enjoy!
Jason Watkins
11/3/15
This article was good and helpful, thanks
When I save the .msp file, I notice an .xml file of the same name is also created. What am I supposed to do with this .xml file? Is it necessary in any way?
Yes. That XML file is necessary. Do not delete it, or remove it from that directory.
This is by far the best write up of the MSP process online. Thank you!!!
Thanks and thanks again for visiting!
Hi, parameter AUTO_ACTIVATE not working in 2016 version.
I had to use this procedure:
https://techallan.blogspot.sk/2015/10/microsoft-office-2016-and-autoactivate.html
Nothing but additional work and trouble !!! Tech should be easy not harder and how is that helping user who dont understand crappy C2R installer ? C2R put him self in protected mode after install and run every time when win runs and wants to have 24/day access to internet – Why ? What is it doing then ?
Did you read the entire post? The methods described therein are meant to install MS Office 2016 onto a copy of Windows which will be turned into an operating system image for mass-distribution. The main principle behind such is the deployment of a complete Windows install which would be immediately ready for the end user after deployment. BYOD is not a factor in this design. As soon as user is ready to use one of my PC’s, everything must be already in place. As convenient as C2R deployments can be, they’re not what’s needed here. If a user wants Office on their own device, one I do not support, and providing the license allows for it, they can Click-to-run at their discretion. Clicking through a few options in a dialog box and creating an unattend file is not a terribly intense process anyway.
Hi,
I followed exactly as above to customize office2016 and created Application Install in my task sequence in SCCM 2016. It downloads office to CCMCache folder on client machine but during the TS build, it hangs on Office installation.
Any suggestion Jason
Hi,
I have little experience with SCCM. However, there are many tutorials online which detail how to install Office 2016 with SCCM. I’d check out YouTube, and Microsoft’s own documentation.
Hola Jason, excelente tutorial, me ha gustado mucho, pero te tengo una pregunta… y que pena la inocencia de la pregunta, pero a cual archivo debo colocarle el 0 adelante?, y puedo enviar desde sccm el instalador y el hace todo el proceso de acuerdo a lo configurado?
Hola,
Gracias. No he trabajado con SCCM en ninguna capacidad. Sé que SCCM puede usar MDT para implementar imágenes, pero eso es todo. Uso MDT solo y, a veces, junto con MS SQL Server Express para automatizar la implementación de cientos de imágenes simultáneamente.
¡Gracias!
Hi Jason,
Your steps works the excellent way and I am able to install MS office 2016 perfectly. I am facing an issue that even-though I have placed our Product key in the installation package its not getting installed along with the package itself.
Its a valid iso I have dowloaded from our MSVL portal and accepts the license key manually after comeplete install.
Please guide me on this.
Thanks again!
Hi,
Are you using a KMS key or an MAK key for your Office install? Note that the above steps do not include Office 365 Click-to-run installations. The MSP file will default to a KMS key/activation unless changed otherwise.
Hi Jason,
I am using MAK key and not using Office 365 Click-to-run installation.
Please guide me how to use MAK key packging for successful product key install.
Thanks!
Hi Jason,
I am using MAK key and not using Office 365 Click-to-run installation. Please guide me how to use MAK in this type of installation.
Hi,
Just embed your MAK key into the MSP file, created by the Office Customization Wizard.
Never thought about doing it with an msp. great info! Thank you for sharing.
https://www.eanescomfort.com/
How about modification of an existing installation? We have deployed Office 2016 using your method, but we did NOT include the Skype for Business component. Now our users need it but we don’t want to re-deploy the full office suite. Is there any way to use OCT to add the Skype for Business component to an existing Office 2016 installation?
Not that I am aware of, at this time. Microsoft Office is all going toward Click-to-run and the Office 365 model. You could create an MSP with the OCT and use a GPO to deploy it. I’d try that first in a test environment.
This article is about using MSP allow unattended install of Office, nothing more. I’ve been using this process for a while so know what’s written here is correct. It’s much more user friendly (user as in the IT guys) compared to creating your own xml from scratch. If you find MSP complicated you must doing something massively wrong as a lot of it is in plain English with dropdown options where they can. My PC deployment preference is MS MDT to install a bare OS. MDT then installs reliant driver followed by applications. Office is a core app so is installed on all machines using the MSP as part of the cmd line. As MDT is modular (OS, drivers, software, extra features) many options can be updated or changed without impacting on other areas. I know I’m drifting away from MSP but I’m just highlighting how useful and versatile it is. The writer has given this article thought and in my view made it easy to follow for 1st timers, giving confidence to explore the tool further. Great job.
Works for me using KMS!
Excellent Advice! Thank you very much. I have one question with regards to the OTC for Office 2016. It creates 2 files, the custom.msp file and a custom.msp.xml file which has references to my profile on the file server and has local file references on the server to custom.msp (i..e C:\) which is not the drive the install files are on. Previous versions of Office OCT programs did not create anything other than a .MSP file I believe. Can I get rid of this file? Is this simply an artefact left behind from the creation of the custom.msp, and perhaps has no value nor purpose and can be deleted? I don’t want to distribute this to other users.
The XML file generated in this process acts like an index for the the MSP package during construction and modification. Similar to an old-school INI file. I’d keep it around wherever the MSP file is used.
Perfect article, it helps a lot!!! Tks =]
Thanks!
Hello,
Very good tutorial but I can’t find in it the answer I’m looking for:
I’m working with SCCM and MSOffice2k16 x86 (with Access disabled) is installed during the staging of the assets but on a few specific assets I want to enable MSAccess on there current Office installation using PowerShell. Therefore I have created an MSP file saying “enable Access” and with a manual double-click on it it’s working but I can’t manage to find a way to write the cmdline in PS :
start-process -FilePath msiexec.exe -ArgumentList ‘/update $ScriptDir\Test_Access_Installation.MSP’ , ‘/quiet’ , ‘/norestart’ -wait
This line isn’t working, plz can you help me ?
A really useful article, thank you for taking the time to compose and post.
A completely silent, unattended install is great but by definition there’s no visible marker to let you know when the MSP based ‘Office 2016’ install routine has actually finished running on a PC.
Would it work/is it possible, to accept the licensing agreement, choose the display level of “None” with the “Suppress modal” check box selected BUT have “Completion notice” ticked as well to help with the problem above?
Hello,
I haven’t seen any such option to display a completion notice at the end of setup. Silent installs are just that, they’re meant to be performed with no interaction. I open task manager and look for Office’s setup process and watch that until it disappears. Not very elegant, but effective.
I think that qualifying each modifier in quotes ‘ ‘ may be throwing off msiexec. I am almost certain the variable isn’t transitive between PowerShell and msiexec, but I could be wrong. Couldn’t you just enter the script’s directory?
Hello Jason,
Thanks for the pointer regarding Task Manager, I hadn’t thought of that.
I’m hoping to use this process to upgrade our computers from ‘Office 2010’ to ‘Office 2016’. I’ve run the MSP based install routine on a test PC and it seemed to complete successfully.
However, when opening Excel, every user is presented with the message “Microsoft Excel isn’t currently your default program for viewing and editing spreadsheets. Do you want to select file types that Excel should open?”.
Did you come up against this? If so, were you able to come up with a fix for all users who log into your computers because we don’t want them to have to be faced with it?
Glen,
You can set your desired application defaults in an existing install of Windows 10, then export them to an XML file with DISM. You can, then, integrate that XML file into an OS image’s WIM with DISM, or assign it via a GPO.
https://docs.microsoft.com/en-us/windows-hardware/manufacture/desktop/export-or-import-default-application-associations
Thanks for the guide..
it’s help me a lot..
This is not working with Office Deployment Tool. Has someone figured out how to use custom.msp with Office Deployment Tool?