Remove the Lock Screen Menu Option in macOS 10.13 High Sierra

Hello,

I consider privacy and security on one’s computer to be very important. In an age where corporations and organizations seek to enhance their data collection methods from people’s computers through “telemetry”, cookies and targeted advertising, it is still important to stick to the basics. Physical security. It is amazing how many times I see people in all places just walk away from their desktops, with everything open, in full view of someone else. I have long since developed the personal habit of locking my computer’s desktop whenever I walk away from it.

In the Microsoft Windows operating system, the desktop will lock automatically when the screensaver is activated. Microsoft provides numerous ways to manage this particular setting. Then, there is the trusted Windows key + L keyboard command to lock things up immediately.

The not-so-enterprise-friendly folks at Apple did not go through that much to give admins or users too many options like their Windows counterparts. I’ve always added the Keychain access shortcut to my menu bar, which allowed me to immediately lock the desktop from its context menu.

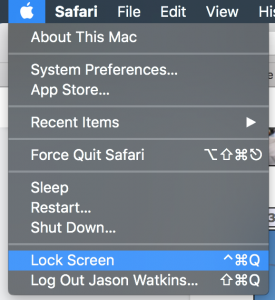
Enter macOS 10.13 “High Sierra”… Among the new additions to macOS was an entry on the Apple menu to lock the screen. Great! Just what I wanted…

Except in public computing environments. Computer labs or classrooms that feature a multiuser setup are not appropriate for locking the desktop. The main reason why is because once the desktop is locked, the only one who can unlock it is the one who locked it in the first place. With classrooms and labs that person is long gone by the time the locked desktop becomes a problem.

Ideally, the fix for this would entail editing a plist somewhere or the application of a configuration policy. Unfortunately, neither of those will work. Configuration policies can remove Shutdown, Restart and Sleep, but not the Lock Computer (yet). I think macOS Server hasn’t caught up with the client yet. While Apple is removing features from Server, maybe they could add a provision to remove the Lock option. Then, we would not have to do the following.

Making this change is not easy or simple for two reasons. The first is System Integrity Protection (SIP) which prevents changes to system files no matter whom you are (root included). The second is that the file we need to edit is buried within the System folder, under a path that will fill a whole line of your terminal window. We’re also going to need a decent text editor. Don’t use TextEdit.app which ships with macOS.

SIP can be disabled from Recovery mode. Reboot the Mac while holding down Command + R. From the recovery environment, open the terminal and enter:

csrutil disable

Reboot the Mac normally and all will be the same, just without SIP obstructing our work.
Next, is to open the Finder or the Terminal, whichever is preferred and naviage to:

/System/Library/Frameworks/Carbon.framework/Versions/A/Frameworks/HIToolbox.framework/Versions/A/Resources/English.lproj/StandardMenus.nib/objects.xib

Copy objects.xib to your desktop or some other place outside of where the original is located. Don’t edit the original! We’ll make a backup copy of the original and edit that, then copy our hacked version into where it belongs.

Objects.xib is an XML file with a ton of entries. Open up the text editor on the copy of objects.xib and search for “Lock Screen”. Remove the whole block of code encompassing the Lock Screen menu item. It will be a few lines. NOTE that there is an id tag within that block of code that is to be removed, tag 311. This also has a separate entry which has to be removed as well. If it is not removed, macOS will still think the Lock Screen entry is within the objects.xib and freeze, breaking the Finder (experience talking). Make sure no more entries for “Lock Screen” and “311” are in the file. Then, save and close.

Rename the original objects.xib file and paste in the modified version under the original name. File ownership needs to be fixed to equal that of the original objects.xib file. Run chmod root:wheel objects.xib from a root session in the terminal (sudo su). The actual permissions should be fine.

Reboot the Mac back into Recovery Mode and re-enable SIP by executing csrutil enable from the terminal, followed by another reboot.

Drum roll… Log in and Lock Screen will be gone. Now, no one will be able to lock the screen from the Apple menu. This procedure does not prevent someone from locking with the keyboard combo. I suspect a fraction of a percent of Mac users actually know that combo from regular use.

Enjoy!

Configure macOS for PennKey Authentication

PennKey logins allow any previously-allowed user within SAS, or the university, the ability to access a public computer without having a local user account on that computer or a domain user account. All Macs in the SAS Central Pool Classrooms use this type of authentication.

Mac OS X uses PennGroups and kerberos to facilitate PennKey authentication. The following procedure works on OS X versions 10.8.4 – 10.14.6

Requirements: access to PennNet, PennGroups LDAP account (ask jasonrw), administrative access to the target Mac OS X 10.8.4 – 10.14.6

UPDATE (1/31/21): Apple introduced lots of changes with macOS 10.15 “Catalina.” Some of these differences broke the manner in which we have traditionally configured PennKey authentication. The good news is that 10.13, 10.14 Macs, configured for PennKey authentication and upgraded to 10.15 continue to permit PennKey logins. The Bigfix fixlet, which configures PennKey authentication no longer works.

The same can be said for macOS 11 (10.16?) “Big Sur.” Upgraded PennKey Macs do continue to permit PennKey logins. The rub is that none of the configuration profiles installed onto macOS are accessible by PennKey users. Admin users are fine, but unprivileged PennKey users will get a barrage of admin authentication prompts which never end. Even if an admin username/password are provided, the prompts keep coming. At this point, Big Sur is not viable for use with PennKey authentication.

UPDATE (2/15/18): The EMS team has created an IEM (BigFix) fixlet which will do all of the following on any relevant Mac. As much fun as it has been going through motions of setting up this type of access manually, it is no longer required.

Note: This process modifies how OS X authenticates users each time they log in. Mistakes here could render the Mac unable to authenticate any user. It would not be a bad idea to make a backup of the target Mac prior to beginning this configuration procedure. I use Disk Utility for this purpose.

The first part of this involves modifying three configuration files that help set up kerberos authentication.

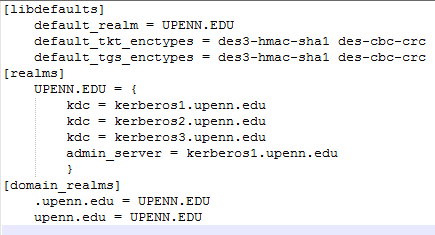
The FIRST part is to create a “krb5.conf” file on the target system, or download one from here or open up the terminal and create a new file, called krb5.conf, under /etc (sudo nano /etc/krb5.conf). Edit the file to match what is listed below.

The completed krb5.conf file

The completed krb5.conf file

The SECOND part is to setup the Mac OS X login window for kerberos authentication by modifying the preexisting “/etc/pam.d/authorization” file.

Again, from the Terminal and type sudo nano /etc/pam.d/authorization. Then, navigate to the first auth optional section and add the value“default_principal” to the end of the line, as shown below.

The /etc/pam.d/authorization file after modification.

The /etc/pam.d/authorization file after modification.

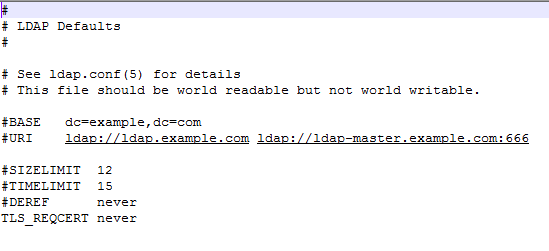
THIRD. Configure Open LDAP to ignore certificates by editing the preexisting “/etc/openldap/ldap.conf” file. From the Terminal, enter the command sudo nano /etc/openldap/ldap.conf. You will need to edit the line that reads TLS_REQCERT DEMAND and change DEMAND to never as shown below.

The modified ldap.conf file. Note the "never" change.

The modified ldap.conf file. Note the “never” change.


FOURTH, configure Directory Access. This is by far the most tricky part of the whole procedure. Steps have to be performed exactly as indicated or else PennKey authentication WILL NOT work.

Open the Directory utility, while logged-in as an admin user. Apple buries the Directory Utility in the Users applet in System Preferences.

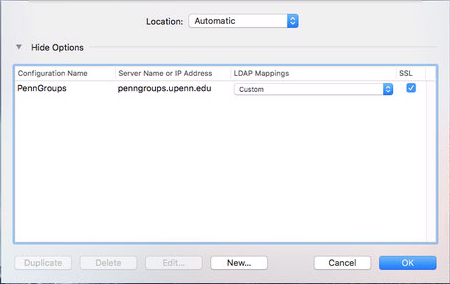
Select LDAPv3 and then click the edit box below and a new window will appear. Click on New then click Manual then click Edit. Under the Connections tab, enter the information as shown in the box below.

  1. name the configuration PennGroups
  2. enter the server name penngroups.upenn.edu
  3. check the box Encrypt using SSL
The custom PennGroups configuration in the Directory Utility.

The custom PennGroups configuration in the Directory Utility.


The PennGroups account settings.

The PennGroups account settings.

Leave the rest at their defaults and then click on Search and Mappings tab at the top.

  1. In the drop down box next to Access this LDAPv3 server… select Custom
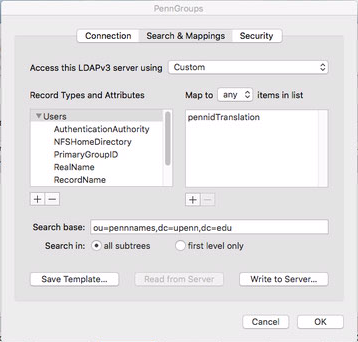
  2. Select the Default Attribute Types, then click Add, then select Record Types and highlight Users
  3. Select the Users record type you just added and click the Add button that is located under the right pane (Map to ‘any’ items in list)
  4. Add the value pennidTranslation and
  5. Set the Search base for the Users record type: ou=pennnames,dc=upenn,dc=edu and select Search in all subtrees as shown below.
The Search & Mappings settings.

The Search & Mappings settings.

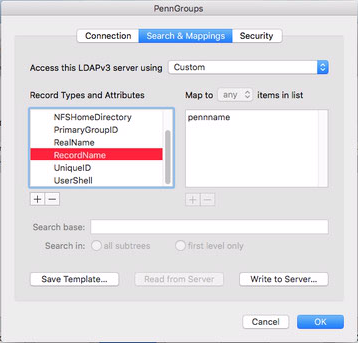
Now comes the fun part, adding the attributes for the Users record type. They all have to be added and in the following order. The order must be correct and exact, or else none of this will work.

  1. AuthenticationAuthority
  2. NFSHomeDirectory
  3. PrimaryGroupID
  4. RealName
  5. RecordName
  6. UniqueID
  7. UserShell
 
Each one of these attributes has a certain value attached to it. The value is entered in the right-hand box, next to the attribute. The first is AuthenticationAuthority.
 
  1. AuthenticationAuthority = pennname
  2. NFSHomeDirectory = #/Users/$pennname$
  3. PrimaryGroupID = #20
  4. RealName = cn
  5. RecordName = pennname
  6. UniqueID = pennid
  7. UserShell = #/bin/bash
An example of one of the attribute settings that must be completed successfully.

An example of one of the attribute settings that must be completed successfully.

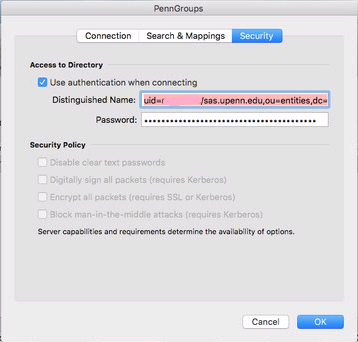
Almost done! Next, we have to configure directory authentication for the whole configuration. ISC would have had to provide the organization with a username and password for this part. Open the “Security” tab next to the “Search and Mappings” tab.

  1. Check the box to Use authentication when connecting
  2. Enter the Distinguished Name of the principal (service account) that has been setup (see the prerequisites) in the format uid=<principal>,ou=entities,dc=upenn,dc=edu
    for example:
    uid=mac-stuff/sas.upenn.edu,ou=entities,dc=upenn,dc=edu
  3. And enter the password for that account, as shown below. OK out of the PennGroups settings dialogs until you are back at the Directory Utility window.
Enter the UID for your organization with the password.

The security tab

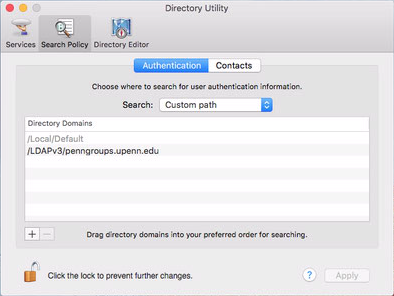
OS X has to be told to check the directory each time a username and password is entered. Click on Search Policy at the top. Make sure you have selected the Authentication button and for the Search option, select Custom Path and then click the Plus (+) to add the LDAP directory, which should be available for you to select as shown below. Click Apply, and you are now finished!


The authentication path lists local account, then directory accounts are checked at log on.

The authentication path lists local account, then directory accounts are checked at log on.

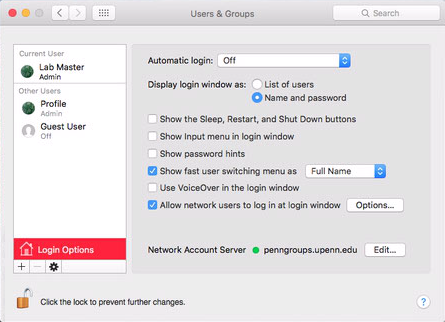
Change the log on window for OS X to not show a list of users, but just the username and password dialog boxes, or else you will not be able to log on with a PennKey. Go into System Preferences \ Users & Groups \ Select the “Login Options” button and select “Name and password” radio button under the “Display login windows as:” section.

The Login Options under the Users & Groups applet.

The Login Options under the Users & Groups applet.

REBOOT and test a PennKey log on. There may be a red dot in the user name field stating network accounts are not available from the log on screen. That *should* go away with a few seconds after the Mac boots. If it does not, check the network connection to PennNet and try again.


I would also add a message to the login screen indicating that PennKey logins are supported in addition to local logins, and that domain logins may or may not be supported. Running the following command from the terminal or from an ARD Unix command will make such a change.

sudo defaults write /Library/Preferences/com.apple.loginwindow LoginwindowText "Please log in with your PennKey username and password."

Enjoy!
Jason Watkins
10/25/2016