
Drivers are a big part of getting Windows to work properly. Anyone who has ever had to troubleshoot a piece of hardware on Windows knows this. When generalizing an installation of Windows for capture with sysprep, all but the most basic drivers are removed. This makes the captured image applicable to many different types of hardware. During a task sequence, MDT runs a plug and play check, for hardware at a couple of different points to determine what drivers, if any, are needed. When a matching driver is found, it is injected into the image before it is applied to the computer’s hard drive. To do this, MDT has a folder/section in the deployment share that is dedicated to organizing and storing drivers. It is called “Out-of-Box-Drivers” (OOBD).
The basic INF files are what MDT needs for driver injection. Many drivers are distributed as packages, which come in the form of an executable. This is not what we need. If an executable is the only way a driver is available, it must be imported as an application into MDT, and installed via task sequence. Fortunately, OEMs like Dell, Lenovo, HP, and even Microsoft make bulk downloads of model-specific drivers available from their sites. Dell hardware drivers come in the form of a CAB file, which can be opened with the expand command, or with a compression/decompression utility like 7-zip.
Bulk-driver Download Sites for Dell, Lenovo, HP, and Microsoft (Surface)
I create a folder structure on the MDT server similar to “Drivers\Windows ##\Vendor\Model.” For example: D:\Drivers\Windows 7\Dell\OptiPlex 990
I do not delineate between x86 and x64 versions of drivers in my folder path because nearly all of my OS deployments are 64-bit. Dell combines x86 and x64 drivers in the same download. Many Dell drivers can be used on both platforms. Lenovo drivers will try to extract to their own, specified path, but that can be changed at runtime. Complete, downloaded driver packs can be between 300MB and 1,000MB in size, except for WinPE driver packs which are very small.
Using the expand command, I’ll extract the drivers to my folder structure.
expand C:\Users\jasonrw\Downloads\990-OptiPlex-ABCDE.cab -f:* “D:\Drivers\Windows 7\Dell\OptiPlex 990”
The command prompt window will scroll really quickly and end with the prompt returning. Now, we can import them into MDT. MDT is able to handle drivers in different manners. The basic default option is to throw all drivers into the same folder at the root OOBD directory. With that, a deployment task will search the entire OOBD store for the right drivers. This increases the chance of the wrong driver being selected. WMI is great, but it is not perfect. Another option is to break down the OOBD store by manufacturer/vendor or by operating system version. Creating folders for Windows 7 and Windows 10, respectively can help minimize the chance of a wrong driver being installed. I take it one step further, actually a couple of steps further. I still use MDT’s WMI hardware-querying capabilities, but I tell it exactly where to look.
I create a specific folder structure under OOBD that matches a specific WMI query I pass on to the deployment task. For example, Windows 7: Out-of-box-drivers\Windows 7\Dell Inc.\OptiPlex 990

The bottom two folder tiers each correspond to variable in a WMI query, Make and Model. To find the make or manufacturer of an OEM PC, run the following command from a command prompt.
wmic computersystem get manufacturer
The returns for Dell and Lenovo are “Dell Inc.” and “Lenovo”
To get the model, run the same command as above, but replace “manufacturer” with “model” Top that off with a folder for OS version and platform, and you have something to use. In the task sequence, a task variable can be inserted into the PreInstall phase, before the inject drivers step to tell the task sequence exactly where to look. The variable is “DriverGroup001”, and the value is “Windows 7 x64\%Make%\%Model%” This will allow a task sequence to correctly use a WMI query to find the drivers for the exact make and model being imaged.
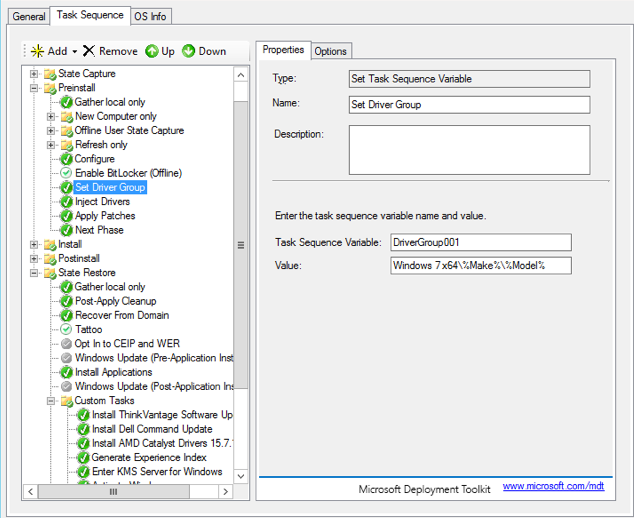
The Inject Drivers step has its own settings that needs to be configured. For our purpose, the selection profile has to be set to “Nothing” with all drivers from the selection profile being used.

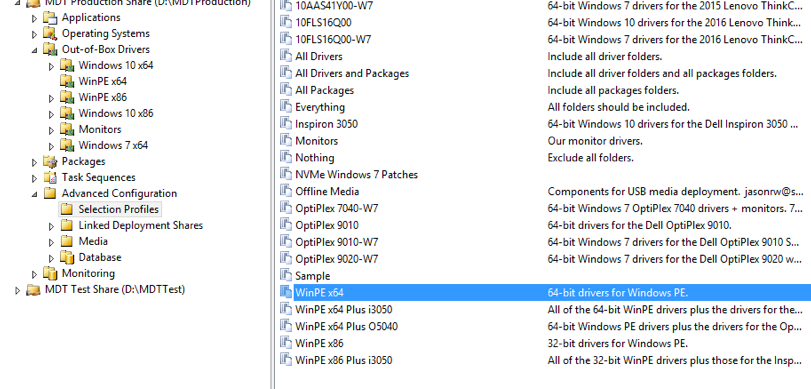
Selection profiles are the ultimate step toward driver control. They are a pre-defined selection of drivers that may encompass and individual model, or manufacturer. MDT ships with a few pre-defined selection profiles, but more can be created to suit any need. Given the exact control this approach provides, there is one detraction, it limits task versatility. Since a selection profile tells a task sequence exactly which drivers to use, MDT doesn’t query for them. The default setting for Inject Drivers is to query the entire OOBD store, but when “Nothing” is set, they querying is off. If it is desired that a task sequence only serve one or two makes of computers, this might be a good approach. I support about a dozen different models from two manufacturers, and I’d like my task sequences to be applicable to all.
I do use a selection profile to organize the drivers I use for my MDT Windows PE ISO/WIM files. Dell and Lenovo make drivers just for Windows PE available as a download too. I use the same approach as above to download, extract, and import the Windows PE drivers into MDT. Then, I create a selection profile for the Windows PE drivers and use that for my ISO/WIM file drivers.
To import drivers into OOBD, make your folders as desired, right-click the folder for the computer model, and choose “Import drivers.” A wizard will open, walking you through the process of importing the drivers from where they were extracted. It is real easy.

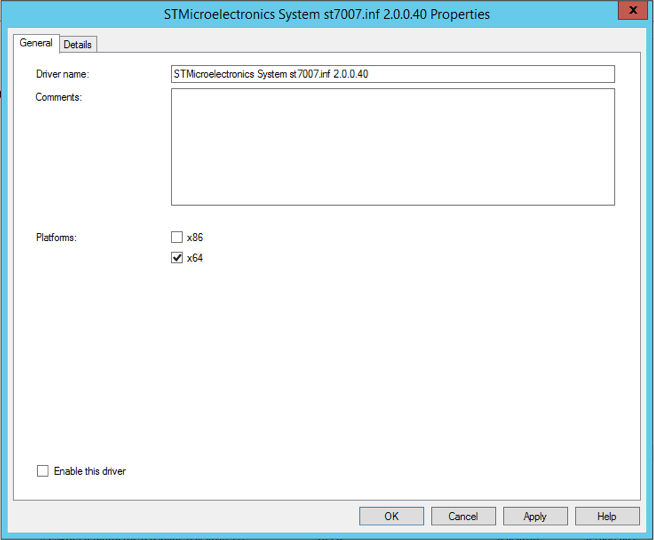
After the driver import, the deployment share must be updated. By default, MDT uses the all network and system drivers it has in the OOBD store for the Windows PE ISO/WIM file. This can be changed, as I described above, with a custom selection profile, but it is not mandatory. Still, note, that each time drivers are added and removed, the deployment share should be updated for those new drivers to be used. Some drivers are clearly depicted whether or not they are x86 or x64. In reality, many single drivers can be used on both platforms, but the descriptor files do not always indicate that to MDT. Thus, MDT will import the driver and override the specified platform. This is noted after all of the drivers have been imported for that operation.

I, personally, write down the name of each driver with a warning, and disable them after the wizard ends. Disabling/deleting a driver is easy, just right-click it in the MDT workbench and choose the appropriate option. Drivers must be disabled from their property sheet. Disabling a driver is a safe approach before it is determined that deletion is necessary. Only ever delete a driver from the MDT workbench. DO NOT go into the driver store via the file system and delete it that way.
Again, when disabling or deleting a driver, you must update the deployment share to take it out of Windows PE.
Finding, downloading, extracting, and importing drivers into MDT is a big part of MDT configuration, which takes a great deal of time. If it is done with forethought and planning, it can minimize the driver problems a deployment share might have, and need only be done once. I note the name and date of the driver files that I download and import into MDT. Then, I can periodically check for updates from the vendor’s web-sites. The older a model is with the manufacturer, the less-frequent they tend to update the drivers packs for that model. If the manufacturer does not make a driver pack available for your model, it is possible, though very tedious, to download each driver, and extract them individually. I try to avoid doing that.
Thanks!
