How to fix MacOS Software Update issues at SAS UPenn

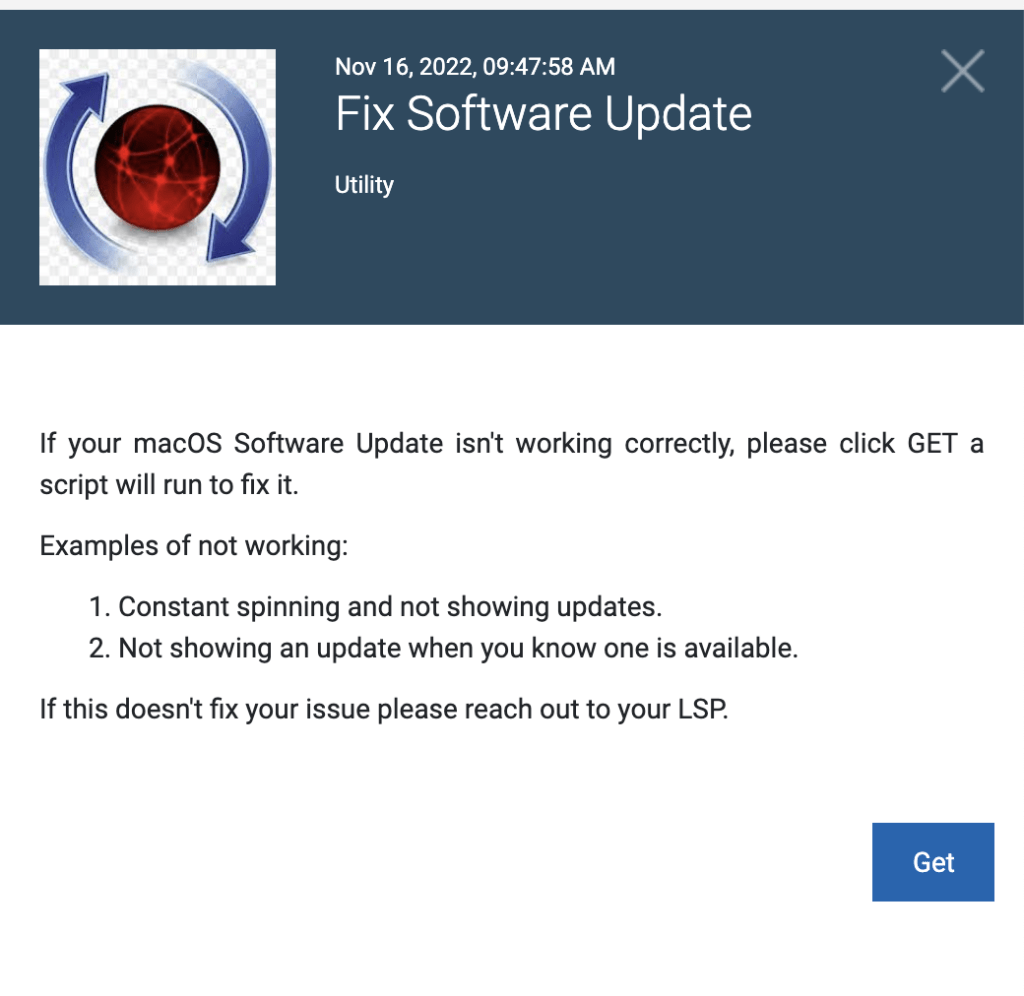
Sometimes MacOS Software Update does not work. It will spin for long amounts of time and/or not display any update information. It’s an unfortunate MacOS bug. In the School of Arts & Sciences at the University of Pennsylvania, we have a solution available to computers running our BigFix management software to fix this issue.

Here’s how it works:

Try looking for the “B” icon on the top menu bar near the clock…it should look like this but possibly in black and white (rather than blue):


Click it and look for the “Fix Software Updates” item in the list of options. Assuming you see it, try clicking on it and then clicking the “Get” button to run it. After a few moments, this should cause the software update functionality to resume working properly and allow you to install the updates hopefully… If this doesn’t work or you don’t see this option available, let me know and we can figure out next steps!

Should You Enroll in the Pennkey Self Service Password Reset System?

Pennkey Self Service Password Reset System

Yes! It is good to enroll in the Pennkey Self Service Password Reset System!

By enrolling, you are simply entering a cell phone number and alternate email address (non UPenn address) into the system so you can reset your Pennkey password (if you ever forget it) by receiving a link/code to that phone number and/or email address.

Otherwise, as it has traditionally been, to reset your Pennkey password, you’d have to take a trip to the PennCard center or a submit a ticket and have a phone call with Computing Services, which will still be an option if need be.

Note: You are not required to reset your actual pennkey password when setting up the Pennkey Self Service settings.

Go here to enroll: https://accounts.pennkey.upenn.edu/pwm/private/updateprofile


NOTE: If you know your Pennkey password and are simply looking to set a new one, go here for more info: https://web.sas.upenn.edu/chmarti/2017/06/12/change-pennkey-password/

How to enroll / join a Chromebook to Penn SAS Management Console

In order to join a Chromebook to the Penn SAS licensed management console, you will have to purchase a license with the Chromebook. Then, follow these steps:

  1. Power on Chromebook (factory reset if it’s already been signed into)
  2. Accept terms and conditions, connect to AirPennNet, but do not sign in
  3. At sign in screen, hit Control+Alt+E
  4. Enter google@sas account name and password and this will enroll the device in SAS’s google management console
  5. I also had to reconnect back to AirPennNet after this for some reason. Even though the info was still saved, I had to clear out my password and re-enter it for it to actually work

How to Enable MacOS Monterey for Accessing Writing Server

Update: Following updates to our server, this process should no longer be necessary.


  1. Open Terminal
  2. Type the following and press enter: mkdir .ssh
  3. Type the following and press enter: pico .ssh/config
  4. Type (or copy and paste) the following code in the document:host *kexalgorithms +diffie-hellman-group1-sha1
  5. Press Control + O  — this will attempt to save the file. To confirm, press the Enter key
  6. Press Control + X to exit
  7. Now, try connecting to the Writing Server as expected, i.e. ssh yourpennkey@writing.upenn.edu
  8. If prompted about the authenticity of the host, simply type “yes” and press enter


Using Zoom with WCOnline at Penn Critical Writing Center

We have recently enabled a Zoom integration for online tutoring sessions conducted through the Critical Writing Center’s WCOnline tutoring scheduler.

Zoom will automatically be utilized for WCOnline appointments, under the following conditions; The tutor hosting the meeting on the schedule must be:

  1. signed up for a Penn Zoom account
  2. signed up for WCOnline using theirpennkey@upenn.edu (e.g. no @sas.upenn.edu). You can click here to change the email address you are using for WCOnline, if need be.

If the tutor is not signed up for Zoom or uses any other email address,  the built-in WCOnline meeting tool will automatically be used instead.

Others (non-tutors) joining the meeting do not need either of the above — they can join the meeting with or without a zoom account and can use WCOnline with any email address.

Tutors with meetings on the WCOnline calendar that will take place on Zoom will see an automatically generated unique Zoom link in the appointment’s details + will see the Zoom meeting scheduled in their Penn Zoom account calendar. There is a chance this could function slightly differently if the tutor has configured their Zoom account to schedule appointments differently.

How to Forward Email Headers in O365

Email headers are used to evaluate an email’s deliverability, including the route it took to arrive in your account and, sometimes, spam ratings. If you need to send headers from an email you received, this is one way to do it if you have an O365 account.

  1. Log into O365 Web Mail: https://outlook.office365.com (make sure you use pennkey@upenn.edu as your username.)
  2. Locate the email message in your O365 webmail and open it.
  3. Click the 3 dots in the top right corner and select View->View Message Details.
  4. When that window pops up, copy the message detail text and paste it wherever you’d like to share it.

forward-email-headers-o365

Zoom Webinar / Large Meeting options for SAS

Contact your LSP if you need Webinar or Large Meeting options (500/1000 participants) for your Penn Zoom account.

Note that the options available to individual users / the general public through the Zoom website cannot be applied to Penn-licensed Zoom accounts. That is, you cannot purchase a month / subscription for webinar or large meeting capacities on Zoom’s websites and apply it to a Penn Zoom account.

For department/users in the School of Arts and Sciences, 1-day and annual licenses are available at a charge.


Some more info is here: https://www.isc.upenn.edu/how-to/zoom-resources-it-staff#FAQ

Getting Started with PowerTerm for Mac for SRS Access (The new DataComet Secure)

Powerterm


The new text-based network access client solution for Mac computers running 10.15+ is called PowerTerm. This emulator software is used to access some systems, such as SRS.

More information and the download link can be found here: https://www.isc.upenn.edu/how-to/powerterm

To get started:

  1. Download the installer from the URL above.
  2. Open the PowerTerm zip file, which will reveal a folder with two files — an App installer and a Session installer file.
  3. Start by opening the App install file. In order to open the file, you will have to right click (or Control + Click) on the file and select “Open”.
  4. You’ll receive a notice that the file is from an unidentified developer. This is fine. Click ok.
  5. Your computer will have to restart once the installer completes. Restart.
  6. When your computer is back up and running, you will need to also run the Session installer file to configure the SRS settings. Find the file and right click (or control + click) on the file and select Open. (Note: If you receive a message that the installer cannot be run on your operating system, you will have to manually drop the session file into the right spot on your computer — click this link for more information on this process.) Once again, it’s okay that it is from an unidentified developer. Run the installer.
  7. PowerTerm will now be in your Applications folder and there will be a shortcut to SRS access.


Uninstalling PowerTerm

To uninstall Powerterm, drag the PowerTerm folder from your applications folder to the Trash. Also, drag the Powerterm folder in /User/username here/PowerTermConfigFolder to the Trash. Then, empty the trash.