Software & Cloud Services Available to Penn Staff & Faculty (Free)

Below is a list of popular software and services licensed by the University and available to Penn Staff and Faculty for free. Click here for a complete list of supported Penn software.


Microsoft Office – available for Penn Faculty and Staff to install for free on up to 5 devices (including desktop, laptop and mobile devices). On a desktop and laptop computer, log in with your O365 account at www.office.com. In the top right hand corner, you should see a button that says “Install Office”. On mobile device, install a Microsoft app from the Apple App Store or Google Play store and then log in with your O365 user name and password.

Penn Box – a cloud file-storage service similar to Dropbox available to all active faculty and staff. Unlimited storage space. http://box.upenn.edu

Last Pass Premium – A secure, password management software that can also generate secure passwords / auto-fill your passwords into your browser and mobile devices  – https://www.isc.upenn.edu/how-to/lastpass

Symantec Anti Virus – Recommended for all desktop and laptop computers. More information: https://www.isc.upenn.edu/how-to/symantec-endpoint-protection#General

Fetch FTP/SFTP Application (Mac): Fetch is the recommended, Penn-licensed application for connecting and conducting file transfers to Penn servers. https://www.isc.upenn.edu/how-to/fetch

Adobe Acrobat Pro (which is now called Acrobat DC Pro) is available for some staff and faculty at the University, if you are using a computer purchased with Penn funds. Contact your Local Support Provider (LSP) to find out if you are eligible.

LabResearch is a cloud-based digital notebook for Lab Researchers to store, organize, share, and publish their laboratory research and data. More information is available here: https://researchnotebooks.upenn.edu/

Qualtrics is a cloud based software for conducting research surveys and is also used for creating simple submission forms (e.g. for applications, registrations, polling). For more information, view the School of Arts and Sciences page about Qualtrics.

Configure Pulse for VPN Access to SAS Resources

Pulse is no longer supported by SAS Computing. Click here for information about Forticlient.


The following services require a Pulse connection as a prerequisite for remote access (including off-campus and any laptop access):

  • Shared drives
  • Filemaker Pro
  • Drupal Test Servers

Steps to configure Pulse for Mac

1.) Download the Pulse installer from here: https://upenn.app.box.com/folder/41746179256

2.) Install Pulse.

3.) If you do not see Pulse on your screen, go to your Applications folder and open “Pulse Secure”. Otherwise, skip to Step 4.

4.)  Click the + sign in the bottom left corner.


5.) Enter the following into the fields and click “Add”:


6.) Click “Connect”


7.) You will be prompted for your Windows AD user name and password (this is the same account used to access the shared drive and Filemaker Pro). Enter them here and click “Connect”.


8.) You will see a green check mark once connected.


9.) Your connection will disconnect each night. In the future, you will be able to “Connect” by clicking the Pulse Secure logo in the top menu bar:


10.) You will now be able to access shared drives, Filemaker Pro and Drupal test servers.

Connecting to AirPennNet with Chromebooks

Users must log into Chromebooks using a Google account, such as a Google@SAS account or any regular Gmail account with Google Apps will do.

Before logging in, users must connect to a wireless network. For security reasons, we must advise that users connect to AirPennNet while using Chromebooks on campus.

1. Click the wireless icon in the lower right corner and select AirPennNet as your network.

2. A window like this will appear:

3. For your connection settings, be sure to use EAP-TTLS for EAP Method, PAP for Phase 2 authentication, with Default for Server CA Certificate.

4. Replace the entire contents of LINE 1 with your PennKey name.

5. Replace the entire contents of LINE 2 with your PennKey password.

6. Press Connect. You will now be able to log in using your Google@SAS or other Gmail account

CPCW 312 Technology Quick Start Guide

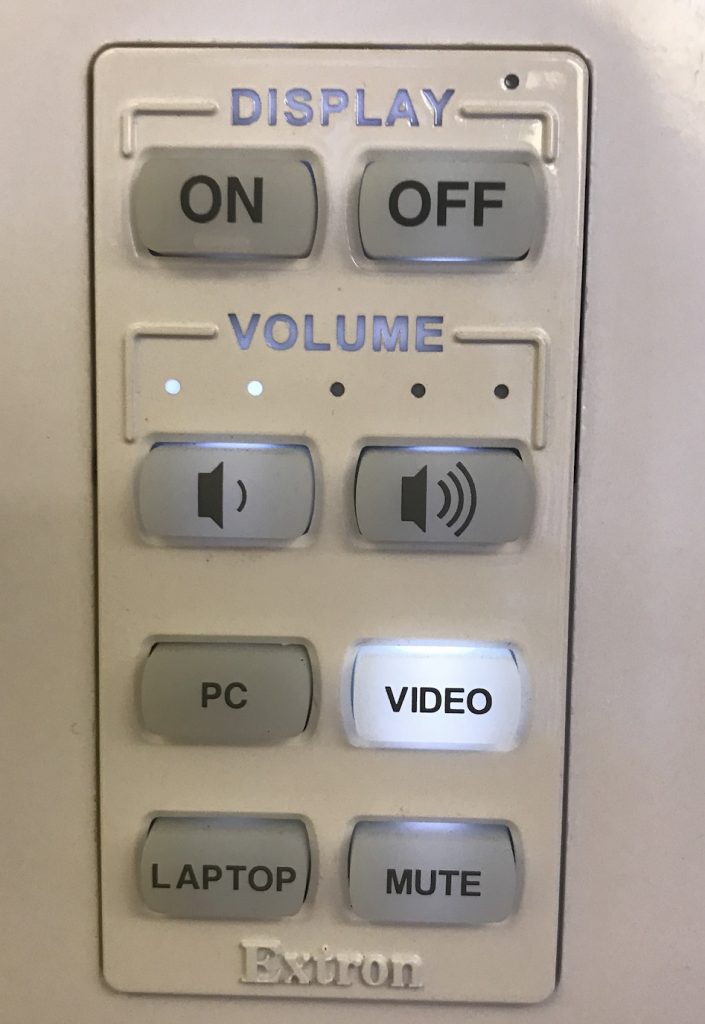
CPCW Room 312 is equipped with a large monitor, in-room iMac, VGA and HDMI laptop hookups and a sound bar.

The Short Version:

Order of Operation is key!

1 . Make sure monitor and sound bar are turned OFF. If using a laptop, do not connect until instructed below.
2. Power on the monitor.
3. Select which input you would like to display (PC (in-room iMac), Laptop or Video).
4. If sound bar did not power on with monitor, power it on now. Make sure the “Input” on the sound bar is set to “TV”.
5. If using a laptop, connect it now. If connecting via VGA and using audio, make sure audio cable is plugged in and that the audio output is set to headphones. If connecting via HDMI, no audio cable is necessary but make sure audio output is set to SHARP HDMI.
6. If audio is not playing out of sound bar, unplug the HDMI connection from the in-room iMac or laptop and plug it back in.


The Long Version (with images):

1 . Start by making sure the monitor and sound bar are turned OFF.

The monitor is turned off / on via the panel on the wall. The sound bar has a power button on the front right and will light up on the left side when powered on. If planning to connect your laptop to the monitor, do not plug in the VGA or HDMI connection until instructed below.


2 . Turn on the monitor by pressing “ON” on the touch panel on the wall.


3. If using a laptop, do not plug the VGA or HDMI cable into it yet! First, press which input you would like to display on the screen.

PC: The iMac that sits immediately below the monitor (no additional connections required)
Laptop: Plug in your own laptop into the wall via VGA (and audio cable, if necessary) connection
Video: Plug in your own laptop or device into the wall plate via HDMI connection


4. If the Sound bar did not automatically turn on when the monitor was powered on, power it on now by pressing the power button on the front right. If the sound bar is powered on, you will see a green light illuminated above the “Status” on the front left of the sound bar.


5. Now, connect your laptop (via VGA or HDMI cable) to the panel box –or– start using the in-room PC (iMac).

Tips On Using the Sound Bar


1 . Make sure the soundbar is powered on and that the light above “TV” is illuminated. If “TV” is not illuminated, hit the “Input” button on the front right of the sound bar till it is lit.


2. If using an HDMI connection, make sure that the sound output on the in-room PC or your laptop is set to “SHARP HDMI”. If using a VGA connection (with the audio cable plugged into your headphone jack), make sure your sound is set to headphones. On a Mac, this is set in System Preferences -> Sound -> Output


3. If sound is still coming out of the in-room PC (iMac) or your laptop speakers, unplug your VGA or HDMI cable and plug it back into your laptop.


4a. Sound bar volume is controlled by using the buttons on the front of the sound bar.


4b. If the sound bar is turned off, monitor volume is controlled by using the volume buttons on the touch panel on the wall.

How to Configure BBEdit (Mac) for Writing Website Editing

If you need to edit the Writing website, the instructions below will help you to configure BBEdit to connect to the server. Note that you need a Writing server account with proper permissions in order to connect to the server. Contact Chris Martin if you need an account. Further, if you do not have BBEdit on your computer, you can download it for free by visiting their website. Note that BBEdit is for Mac only.


1 . When you first open BBEdit, you should see a “FTP Browser” window. If you do not, click File->New->FTP/SFTP Browser window. Click the “Connect” button.


2. Enter the following for each field:

Server: writing.upenn.edu
CHECK the SFTP box
Port: 22
User: Enter your Pennkey username here
Password: Enter your writing server password here
Path: /www/data/writing

Click “Connect”


3. If you receive a pop-up about the authenticity of the host, click “Yes” or “Continue”

You will now be connected to the Writing Server!


4. [Optional but Recommended] To bookmark the server for quick access in the future, click the folder dropdown at the top center of the FTP Browser window and click “Add Bookmark”.

When prompted for a “Bookmark name”, enter “Writing Server.”

When you restart BBEdit, you can now quickly access the Writing Server bookmark in the FTP Browser window by clicking “Connect” and the Blue Flag icon.

Classroom 111 Technology Quick Start Guide

Use the instructions below to get started with using the technology in Classroom 111 at CPCW (3808 Walnut). If you need assistance, call 215-898-4947.

Turning On and Using the Monitor

1 . To begin, make sure the small touch screen on the rack is turned on. If not, tap the power button.


2. If the system is powered off, you will see this screen. Tap the icon in the center to power on the system. If the system is already powered on, you will see the screen in Step 3.


3. Select what you would like to display on the screen:

  • In-room PC (hit the SPACE BAR to wake up the computer and log in with your Pennkey)
  • BluRay Player
  • Laptop (if you select laptop, see note below)


If you selected “Laptop”…

There is a VGA and HDMI cable attached to the rack. Plug one of them into your laptop. On the touchscreen, make sure to select either “VGA” or “HDMI” accordingly.

VGA only: If you need audio, plug the provided audio cable into the headphone jack of your laptop as well. HDMI connections do not require the use of the audio cable.


Volume Control

To control the volume levels, use the UP and DOWN arrows on the bottom right of the touch screen.

If you are using your own laptop with a VGA connection, you will need to connect the available audio cable to your headphone jack.

For best results, make sure the volume on the in-room PC or your laptop is turned UP.


Powering Off the System

1 . To shut down the system, tap the “System Off” button on the bottom left of the touch screen.


2. Confirm you want to power off the system by pressing the button in the center of the touch screen.

How To Change Writing Server Password

Note: If you are setting up a new account, I will send you a temporary password separately via Penn’s Secure Share service.


To change your password:

On a Mac computer, open “Terminal” (in Applications->Utilities) and connect to the writing server by entering the following command:
ssh yourpennkeyhere@writing.upenn.edu

It will ask for your password. Enter your current password, if you know it — or — the temporary password I sent you.

Now that you are connected to the Writing server, enter the following command:
passwd

This will prompt you for your current password followed by a request for the new password you would like to use followed by the enter key. Note that your password cannot be based on a dictionary word, so you might have to be a bit creative. You will have to confirm your new password by entering it a second time.